


Review: DJI Osmo Pocket
Content:
Page 1: Specs, Accessories, Activation
Page 2: How to use, Mimo App
Page 3: Pro & Cons, Rating
Page 4: Tips, Tricks und Mods
Page 5: Videos
| DJI Osmo Pocket & Accessories: |
|---|
| DJI Osmo Pocket 15% Off - Code: OSMO15 |
| ND Filter Set for Osmo Pocket |
| Osmo Pocket Tripod |
| Mini Tripod for Osmo Pocket |
| Skins / Decals for Osmo Pocket |
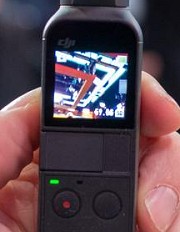
Manual operation
Using the Osmo Pocket without an app is very straightforward: there are only two buttons on the front panel – one switches the Osmo Pocket on or off, the other starts or stops recording video or takes a photo.
The power button must be pressed for two seconds to switch the Osmo on or off. This prevents accidental activation. The Osmo is ready to use in about two seconds after switching on. In addition, the power button offers further functions:
Press once: Quickly switch between photo and video mode.
Press twice: The gimbal or camera centers itself.
Press three times: Osmo switches to selfie mode and rotates towards you, activating face recognition at the same time. In selfie mode, the Osmo automatically follows your face while you speak into the camera -very convenient!
Filming with the Osmo is a breeze. The electronic gimbal automatically ensures a smooth, shake-free camera operation in all situations. The move speed of the gimbal can be adjusted in the settings menu (slow and smooth or fast).
The Touch Screen
The display may seem a bit tiny at first but it proves to be very useful to control your recordings. It’s amazing how easy it is to operate the Osmo via the touch screen, despite its small display size:
Panning up/down: Pan the camera up and down by swiping vertically at the the far right edge of the screen. This works amazingly smoothly and precisely. You can also set Osmo to automatically pan up and down by simply tilting your hand.
Focus: Tap a spot on the display to manually set the focus at any time. The autofocus works fine in most situations, but in low contrast situations or with very diffuse subjects it is sometimes better to set it manually.
Change recording modes: Swiping from right to left on the display opens a menu where you can set the recording mode (video, photo, timelapse, panorama etc.).
Playback / delete files: Swipe from left to right to open the file menu where you can playback or delete already recorded videos and photos on the SD card.
Settings menu: Swipe from top to bottom on the display to get into the settings menu where you can format your SD card, set the white balance, image format and quality or the photo resolution. Unfortunately, not all settings of the Osmo Pocket are accessible here yet. To see all available settings you currently have to use the app (the Osmo saves the changes made in the app and can then be operated without the app). However, it is very likely that upcoming firmware updates will allow to change more and more settings on the Osmo Pocket itself. This is a pure firmware thing.
Tracking an object: Dragging a square around a person or object on the touch screen activates the Osmo Pocket’s automatic tracking mode. The camera then automatically smoothly follows the selected object.
The DJI Mimo App
Unfortunately DJI wasn’t aware that there are millions of Android devices out there with a Micro USB port isntead of an USB-C or Lightning connection. If you are one of the many millions of users who have an Android device with Micro USB port, an adapter is necessary (available for 5-10 USD on Ebay), which can then be plugged into the lower USB-C port of the Osmo. This works, but is not as comfortable as simple plugging the Omso into the side of your device. But there are already some 3D-printed solutions available on Thingiverse to compensate this.
As soon as the Osmo Pocket has been connected to a smartphone or tablet and is switched on, the DJI Mimo app launches automatically. The Mimo app is operated very similar to the DJI app for the Spark, Mavic or other DJI drones. The app’s UI is quite intuitive, so we won’t go into detail here. There are already lots of Youtube videos available that show how to use the Mimo app.
Using the app with the Osmo offers both, pro and cons in practice. Sure, the app has a much bigger screen instead of the small display. You can pan and tile the Osmo into all directions with the app’s virtual joystick and also change ALL the available Osmo settings – but it also makes the handling of the Osmo more cumbersome than simply filming from your hand.
UPDATE:
With the firmware update February 2019 almost all PRO settings (like ISO, shutter speed, color settings and much more) can now be done directly on the Omso Pocket without the need of the Mimo app, so the Osmo Pocket is now in no way inferior to a professional camera.
Whether you use the app or the Osmo alone just depends on the intended use. If, for example, you want to film a ride on your e-board, you’ll prefer to use the Osmo alone and simply film out of your hand. Filming with the app is recommended for more sophisticated photos (timelapse, special exposures, etc.), as the app also displays overexposed and underexposed areas, as well as a histogram. Also with timelapse shots, it might be better to first check the waypoints on a large screen before shooting for hours.
On the next page: Pro and Cons, Summary
View all articlesArticles in this category
Recent Comments
Leave a Reply
You must be logged in to post a comment.

Hallo
Gefällt mir sehr gut der Bericht.
Ich habe jedoch eine Frage.
Welche FPS Einstellung würdest Du empfehlen, bei 4K 60, oder? Und wieviel FPS bei full HD?
Vorab vielen Dank
Dirk, das ist eigentlich eine Frage des persönlichen Geschmacks. Ich persönlich bevorzuge 60 FPS, da man hier das Videomaterial später auch in moderater Zeitlupe laufen lassen, also etwas langsamer abspielen kann, ohne das es zu ruckelig aussieht. Ausserdem ist das Videobild so aufgrund des schnellen Shutters gestochen scharf, so das man auch einzelne Standbilder verwenden kann. Schwenks sind mit 60 FPS schön flüssig und butterweich.
Andere bevorzugen aber 24 FPS. Das wirkt "kino-mässiger" (Kinofilme werden meist in 24 FPS gedreht) und hier ist dann auch die Belichtungsdauer (Shutter) etwas länger, wobei Bewegungen in den einzelnen Frames etwas verschwimmen (Motion Blurring). Eben wie in Kinofilmen auch. Das Motion Blurring kann man durch die Verwendung von ND Filtern sogar noch verstärken, wenn man es möchte. Bei Schwenks sollte man dann aber etwas langsamer rangehen, um Ruckler und verschwommene Objekte zu vermeiden.
Hallo !
Welche Einstellungen würdest du empfehlen , wenn ich im Sommer nach Asien fahre und da nur schöne Aufnahmen machen will.
Danke sehr!
Gruß
Zsolt
In den meisten Fällen ist die Automatik die richtige Wahl – der Pocket macht das schon recht gut. In speziellen Situationen (z.B. bei Nacht) kann man auf manuelle Einstellungen wechseln, sofern man sich mit Belichtungszeiten usw. auskennt.
Wenn dein Zielgerät ein 4K-Monitor ist, empfiehlt es sich, in 4K zu filmen. Wenn dir Full HD aber reicht, filme lieber in 1080p, das schafft deutlich mehr Platz auf der SD-Karte und der Akku reicht um ein Vielfaches länger.
Guten Tag,
was bewirkt die Einstellung Glamour Effekt unter den Fotoeinstellungen?
Danke Gruß
Thorsten
Thorsten, der Glamour-Effekt verschönert Selfies. Die automatische Gesichtserkennung des Pocket lässt Haut und Gesicht dann besser aussehen – vorteilhaft, wenn man sich gerade mal nicht rasiert hat 😊
Hallo !,
wenn ich mit der Mimo App einen Clip erstellen möchte, kann ich da auch Bilder/Videos die mit dem Iphone gemacht worden sind einfügen ?
Danke
Gruß Henrik
Das kann ich dir leider nicht beantworten, da ich dieses Feature nie nutze und zum Editieren meiner Aufnahmen einen "richtigen" Videoeditor vorziehe.
Hier gibt es Infos zum Story Mode (aber leider nichts über das Einfügen eigener Photos):
https://store.dji.com/guides/osmo-pocket-story-mode/
Kann ich meinen DJI- Osmo Pocket über einen Adapter(HDMI) direkt an einen Flat TV anschließen? Welcher Adapter ist kompatibel?
Soweit ich weiss, geht das mom. nur über Bastellösungen wie z.B. den Cosmostreamer:
http://cosmostreamer.com/products/pocketosmo/diy/
Aber wozu sollte das gut sein? Man braucht doch nur ein Tablet oder Phone via USB anschliessen und kann sich dort in der App das Live Bild oder Aufnahmen auf einem grösseren Display ansehen. Unterwegs reicht das doch in der Regel völlig – oder einfach die SD-Karte aus dem Osmo nehmen und in den TV stecken.