


Review: DJI Osmo Pocket
Content:
Page 1: Specs, Accessories, Activation
Page 2: How to use, Mimo App
Page 3: Pro & Cons, Rating
Page 4: Tips, Tricks und Mods
Page 5: Videos
| DJI Osmo Pocket & Accessories: |
|---|
| DJI Osmo Pocket 15% Off - Code: OSMO15 |
| ND Filter Set for Osmo Pocket |
| Osmo Pocket Tripod |
| Mini Tripod for Osmo Pocket |
| Skins / Decals for Osmo Pocket |
Tips, Tricks and Mods for the DJI Osmo Pocket
Skins & Decals
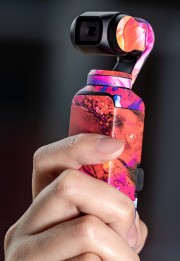
These original and colorful decals can be removed at any time without leaving any residue. They also serve another purpose: the 3M Scotchcal material protects the Osmo’s case from scratches, UV radiation and moisture.
Decals for the Osmo Pocket are available here
Manual gimbal adjustment
What many people don’t know: the gimbal of the Osmo Pocket can also be aligned manually instead of using the touch display. Simply grab it gently with two fingers and turn it to the desired position. Don’t worry: this won’t damage the gimbal in any way, because this is actually an intended feature. As soon as you grab the gimbal, the pocket “recognizes” that you want to adjust the gimbal and it can be guided smoothly into any desired position – that’s very practical!
Focussing objects
The automatic focus of the Osmo Pocket works very well in most situations – but sometimes you want to focus on a specific object that is placed off-center or has a low contrast. This is done by simply tapping on the desired position of the image on the touch screen. The Osmo Pocket then takes this position as a reference for automatic exposure and focusses on this spot. This is especially helpful in low-contrast environments or when the subject to focus is quite diffuse.
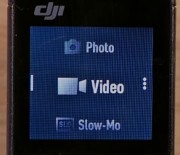
200 FPS slow motion
In the Osmo Pocket’s menu, the frame rate can currently be set to up to 120 FPS. This already allows quite respectable slow-motion shots (the higher the frame rate during filming, the slower the recorded video can be played later without unpleasant jerking effects). However, the Osmo even manages 200 frames per second. However, this setting is currently only available via the app.
Touch menu gotchas
The white bar is not a scroll indicator as you would probably think, but indicates in which direction you’ll return to the main screen. The three points, on the other hand, indicate that there are further options besides a menu point which are accessible via a swipe gesture.
Panning the gimbal via touch screen
If you want to gently pan the gimbal up or down without the app, just tap on the right edge of the touch screen and then slowly move your finger up or down. This way the gimbal can be panned very precisely. A nice gimmick: while using this feature, a scale with an arrow appears on the opposite side of the display showing how far the gimbal is pointing up or down. There you can also read where the gimbal’s center position is. The gimbal can also be quickly returned to the center position at any time by tapping the hardware power button twice.
Time lapse with additional waypoints
If you start a time-lapse recording via the touch menu of the Osmo Pocket, two waypoints are available: the start position and the end position. Both can be selected by turning the gimbal manually to one position and then to the other. During time-lapse recording, the Osmo then automatically moves (rotates) from the start position to the end position. But there are also automatic time-lapse recordings with up to four waypoints possible – for this you have to use the Mimo app. Here you can currently enter up to four waypoints for the automatic pan.
Portrait mode
If you would like to take a portrait photo, you just need to hold the Osmo Pocket horizontally. It will then automatically switch to portrait mode. Thank God this only works with photos at the moment, not with videos – so you don’t have to be afraid to produce any portrait mode videos.
Film at 100 Mbit/s
The Osmo’s highest bit rate of 100 Mbit per second is currently only available in 4K 60 FPS mode. The highest bitrate for the currently selected video mode is obtained by selecting the “Superfine” option in the video menu of the Osmo Pocket. However, this option is not available for all selected resolutions. Note: activating the “Superfine” option will shorten the Osmo’s battery life and is also not always necessary, since extreme sharpness is not always intended in every situation.
Reduce video noise
Those who film at night or at low brightness situations should choose a resolution of 1080p instead of 4K resolution. Especially at higher ISO values, this distinctly minimizes the image noise that digital cameras like to produce in poor lighting conditions. In general, you should always choose the lowest possible ISO value in low light conditions, because the higher this value is set, the stronger the video noise will be. In the automatic setting, the Osmo automatically jumps to correspondingly high ISO values. If you want to avoid this, use the Mimo App and switch to the “Pro” mode to manually select the ISO value.
Optimal sound quality
Of course, this also applies to the other microphone, which is located just below the touch display. For selfies, this is exactly the right place – but if you want to get the best sound quality with objects located in front of you, it is recommended to hold the Osmo Pockt with the touch display facing forward, so that the microphone points to the sound source. Since you cannot look at the display then, you should aim the gimbal manually in such a situation (simply grab it with two fingers and turn it to face the subject).
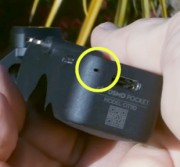
Charging Status LED
When charging, the small green LED of the Osmo Pocket flashes. As long as the LED keeps flashing, the Osmo is charging. However, the flashing of the LED also has a certain meaning and indicates the current charge status of the battery:
| LED | Charge Level: |
|---|---|
| Blink 1x | 0-24% |
| Blink 2x | 25-49% |
| Blink 3x | 50-74% |
| Blink 4x | 75-99% |
| 6 seconds green, then turns off | 100% |
Mini Tripod, Gopro Adapter
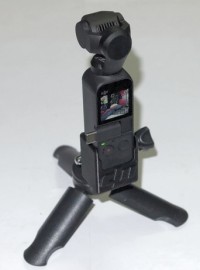
Especially for timelapse shots – or if you don’t want to hold the Osmo Pocket in your hand while filming yourself from a certain distance – a handy mini tripod is recommended. This tripod weighs only a few grams and fits in every pocket. Since the Osmo Pocket unfortunately has no tripod thread, it is recommended to choose the Gopro version of this tripod. You can then use the above mentioned Gopro adapter to attach the Osmo to the tripod.
Modded Case & Gimbal Cap
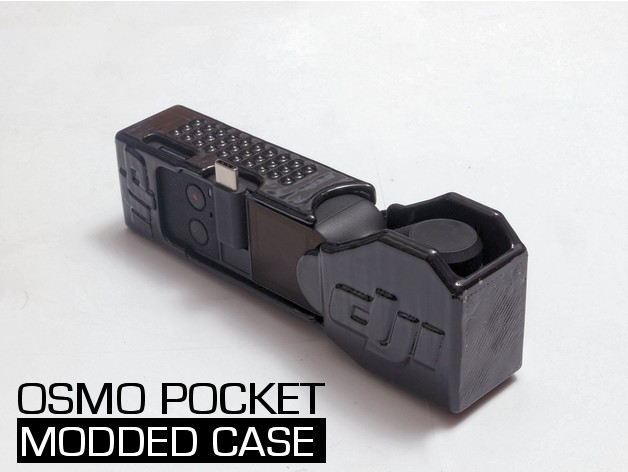
The original case of the Osmo Pocket is very stable and stylish, but has a disadvantage: you can’t film while the Osmo is in it and have to remove it first. More practical is a modded case, which consists of two separate pieces: a protective cover for the body of the Osmo and a gimbal cap. The gimbal cap can be removed quickly while the body of the Osmo stays permanently protected from scratches. In addition, the protective cover always offers a good and firm grip thanks to an anti-slip texture. The Mod Case also has a practical Gopro connector, with which the Osmo can be attached to a conventional Gopro Mount.
This 3D-printable Osmo Pocket Mod Case can be downloaded for free on Thingiverse.
On the next page: Videos (comparison Osmo Pocket with GoPro 7 and others)
You think this article raised lots of questions? Or you're interested into this topic and would like to know more about? Want to express your personal oppinion? Then feel free to drop a comment here.
 Author: Mike vom Mars
A couple of years ago, Mike emigrated from his home planet to Earth to study and examine the human species. His findings offer a deep insight into the nature of human beings and their strange society.
Articles in this category
Recent Comments
Leave a Reply
You must be logged in to post a comment.

Hallo
Gefällt mir sehr gut der Bericht.
Ich habe jedoch eine Frage.
Welche FPS Einstellung würdest Du empfehlen, bei 4K 60, oder? Und wieviel FPS bei full HD?
Vorab vielen Dank
Dirk, das ist eigentlich eine Frage des persönlichen Geschmacks. Ich persönlich bevorzuge 60 FPS, da man hier das Videomaterial später auch in moderater Zeitlupe laufen lassen, also etwas langsamer abspielen kann, ohne das es zu ruckelig aussieht. Ausserdem ist das Videobild so aufgrund des schnellen Shutters gestochen scharf, so das man auch einzelne Standbilder verwenden kann. Schwenks sind mit 60 FPS schön flüssig und butterweich.
Andere bevorzugen aber 24 FPS. Das wirkt "kino-mässiger" (Kinofilme werden meist in 24 FPS gedreht) und hier ist dann auch die Belichtungsdauer (Shutter) etwas länger, wobei Bewegungen in den einzelnen Frames etwas verschwimmen (Motion Blurring). Eben wie in Kinofilmen auch. Das Motion Blurring kann man durch die Verwendung von ND Filtern sogar noch verstärken, wenn man es möchte. Bei Schwenks sollte man dann aber etwas langsamer rangehen, um Ruckler und verschwommene Objekte zu vermeiden.
Hallo !
Welche Einstellungen würdest du empfehlen , wenn ich im Sommer nach Asien fahre und da nur schöne Aufnahmen machen will.
Danke sehr!
Gruß
Zsolt
In den meisten Fällen ist die Automatik die richtige Wahl – der Pocket macht das schon recht gut. In speziellen Situationen (z.B. bei Nacht) kann man auf manuelle Einstellungen wechseln, sofern man sich mit Belichtungszeiten usw. auskennt.
Wenn dein Zielgerät ein 4K-Monitor ist, empfiehlt es sich, in 4K zu filmen. Wenn dir Full HD aber reicht, filme lieber in 1080p, das schafft deutlich mehr Platz auf der SD-Karte und der Akku reicht um ein Vielfaches länger.
Guten Tag,
was bewirkt die Einstellung Glamour Effekt unter den Fotoeinstellungen?
Danke Gruß
Thorsten
Thorsten, der Glamour-Effekt verschönert Selfies. Die automatische Gesichtserkennung des Pocket lässt Haut und Gesicht dann besser aussehen – vorteilhaft, wenn man sich gerade mal nicht rasiert hat 😊
Hallo !,
wenn ich mit der Mimo App einen Clip erstellen möchte, kann ich da auch Bilder/Videos die mit dem Iphone gemacht worden sind einfügen ?
Danke
Gruß Henrik
Das kann ich dir leider nicht beantworten, da ich dieses Feature nie nutze und zum Editieren meiner Aufnahmen einen "richtigen" Videoeditor vorziehe.
Hier gibt es Infos zum Story Mode (aber leider nichts über das Einfügen eigener Photos):
https://store.dji.com/guides/osmo-pocket-story-mode/
Kann ich meinen DJI- Osmo Pocket über einen Adapter(HDMI) direkt an einen Flat TV anschließen? Welcher Adapter ist kompatibel?
Soweit ich weiss, geht das mom. nur über Bastellösungen wie z.B. den Cosmostreamer:
http://cosmostreamer.com/products/pocketosmo/diy/
Aber wozu sollte das gut sein? Man braucht doch nur ein Tablet oder Phone via USB anschliessen und kann sich dort in der App das Live Bild oder Aufnahmen auf einem grösseren Display ansehen. Unterwegs reicht das doch in der Regel völlig – oder einfach die SD-Karte aus dem Osmo nehmen und in den TV stecken.