


KingKong 90GT Modding
Some mods are essential for the 90GT. Here are the most important:
Installing a Buzzer
A buzzer (beeper or modelfinder) that can be activated via a switch on the TX is a must. It may seem unimportant, but if you have ever lost a copter in the high grass, you’ll know about it’s value. Unfortunately, there are no buzzer pins on the board of the KingKong 90GT so you have to go a little detour over the motor pads. Instructions for the buzzer installation can be found below. Be sure to order the Matek Lost Model Beeper before.
Installing an LED Strip
Installing an LED strip greatly improves the visibility of the KingKong 90GT. It makes the tiny quad more visible in the air, but also helps to recover it after a crash in the higher grass. The Eachine QX95 LED strip is a perfect match here. Installation instructions can be found below.
Raising the Camera
Screw off the upper frame plate of the 90GT (where the video transmitter is glued on). The camera is glued to the upper edge of this plate. Carefully break it lose. Then take a double-sided adhesive pad (or hot glue) and tilt the camera at about 30-45 degrees. Then simply screw the frame plate back and you’re ready to go.
Alternative Props
The original props are quite efficient, but not very flexible and therefore tend to break easily. A very good alternative are the 1935 5-blade Racerstar Props. They’re much more flexible. However, the original props are available here, in case you should prefer them instead of Racerstars.
DShot
The KingKong 90GT’ ESCs are DShot capable, but you’ll need to install BetaFlight 3.1 or higher first to activate it. When set to DShot, you don’t need to calibrate the ESCs anymore since DShot is a digital protocol, not an analogue.
Rapid battery change
Because I was fed up with the lipo change fiddling, I designed a simple but effective lipo tray / mount for the KingKong which perfectly holds the Hobbyking 2S 850mAh (or smaller) batteries. Download the lipo tray
at Thingiverse.
Installing a Buzzer
If you don’t want to lose your KingKong 90GT in the grass, there is no way around a buzzer. Get the Matek Lost Model Beeper that can also be activated via a switch on your TX. Since the board of the KingKong does not have any buzzer pins, you must go a small detour – which however works just as well:
Soldering the Buzzer
Find the three pins of motor 6 on the board. These are found on the left rear side when the KingKong is facing forward (see picture):
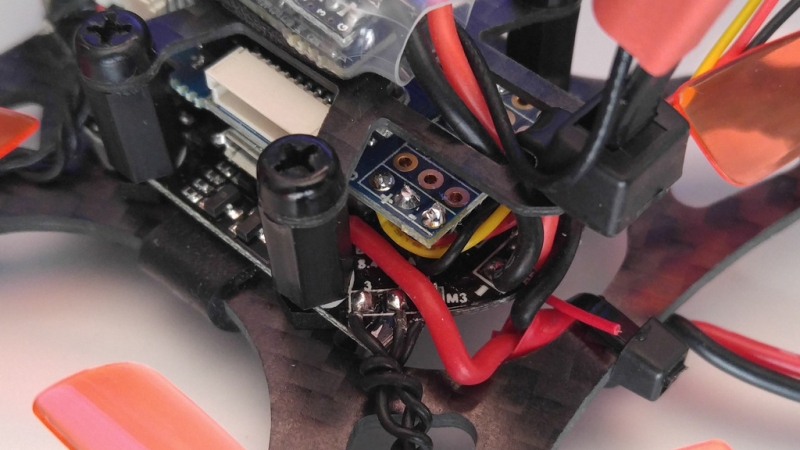
Motor 6 pins (top pin: signal, middle: 5V, bottom pin: GND)
The Matek Buzzer goes to these three pins. The B connector of the buzzer is connected to the motor signal pin, 5V to 5V and G to GND. Mount the buzzer with wires of approximately 5-7cm length, then you can lead those wires below the board and stick the buzzer on the right side of the quad (the left side is occupied by the USB port). Do not forget to isolate the back side of the buzzer with hot glue or an adhesive pad to avoid unwanted short circuits:
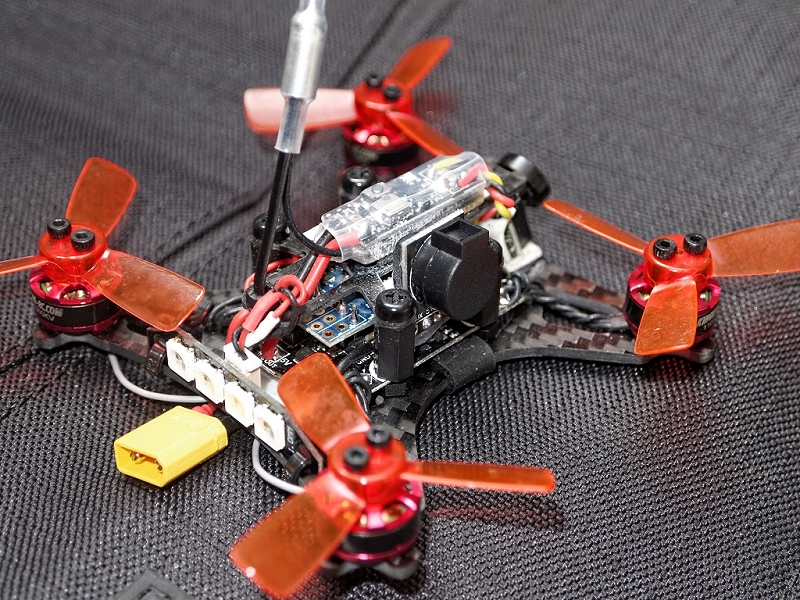
Buzzer attached laterally
Configuring the Buzzer
Once the buzzer is connected to the board, we have to configure it first in BetaFlight. Flash to a newer BetaFlight version (3.1.6 for example) before to get sure that beeper commands (as well as DShot) are supported. So it’s worth updating!
Go to the CLI page in BetaFlight and type “resource”. In the output window there should be an entry with “MOTOR 6” and “B09”, as well as an entry with “BEEPER” and “C15”. The motor 6 resource is what we now throw out and put the Beeper on “B09” instead:
Type “resource motor 6 none” (Enter)
Type “beeper motor 6 none” (Enter)
Type “save” (Enter)
Now both resources are freed. After the automatic reboot, head back to the CLI page. Now let’s put the beeper to B09:
Type “resource beeper b09” (Enter)
Type “save” (Enter)
Now we have to tell BetaFlight WHEN the buzzer should start beeping. First we clear all pre-existing alarm conditions:
Type “beeper -all” (Enter)
Type “save” (Enter)
Now we specifiy our buzzer conditions – copy the follwing into the text box and hit Enter:
beeper GYRO_CALIBRATED
beeper RX_LOST
beeper DISARMING
beeper ARMING
beeper RX_SET
beeper READY_BEEP
beeper MULTI_BEEPS
beeper SYSTEM_INIT
beeper ON_USB
save
The buzzer now alarms when the signal of the TX is lost, on arming / disarming, when the quad is powered on etc. If you want to activate the low voltage alarm as well, enter the following commands:
Type “beeper BAT_CRIT_LOW” (Enter)
Type “save” (Enter)
Now go to the “Modes” page to specify a TX switch for the beeper. Active the “Beeper” mode there and assign an AUX channel that correspondends to a switch on your TX. Done!
The buzzer only works while the quad is battery powered, so you’ll have to plug in a Lipo to test ist. If you find the buzzer ALWAYS beeping, enter the following commands:
Type “set beeper_inversion = OFF” (Enter)
Type “save” (Enter)
Have fun with your buzzer – you’ll be amazed how noisy the little quad can be!
Next page: Installing the LED strip.
View all articlesArticles in this category
Recent Comments
Leave a Reply
You must be logged in to post a comment.

Very good writeup on the 90gt. Any more tips.on tuning will be appreciated.
This is great, very nice writeup – don't suppose you've added OSD to your 90GT? I'd love to see a similar writeup for that with wiring diagrams etc.
I did not add an OSD yet since I don't see any reason to do so. The only useful information would be the battery voltage, but I set up a timer on my TX that alerts me in time. If there are other advantages of adding an OSD, let me know and I'll probably give it a try
Hi Mike, how did you *hide* the dsm receiver in this KingKong without using your designed lipo tray?
Bob, I added three more pictures to the slide show above that show how I added the receiver. See the last three images. Watch the green / yellow / black cable, they go to the receiver. I placed it on top using some hot glue. You have to tilt the receiver 90 degrees the side and place it between the buzzer and the video transmitter.
Is there a way to adjust the low voltage cutoff my drone drops out when I give full throttle at around 3 half min than it'll fly unless I punch it. 450mah 50c
If the quad powers off or reboots, it may be caused either by a weak (old) Lipo or a weak LDO. The LDO is the part on the flight controller board that supplies constant 5V power. If the LDO can't deliver enough regulated 5V power for the receiver, cam, VTX etc., the board will shut down or reboot. The lag of power supply could be solved by adding a 5V BEC (like this one: http://bit.ly/2Dh7I1Z). Its power output is much more stable than the built in power converter (also provides more ampere). The BEC's input is connected directly to the Lipo pads, the output can be used to feed receiver, LEDs, cam, VTX etc.
Please help, I follow your the buzzer instruction that is good but when Arming and flying the buzzer work during flying and stop when disarming.
@Nguyen: probably a too sensitive low voltage setting in Betaflight? Also install the latest Betaflight GUI, it has a section to configure the buzzer in detail (beep conditions). Also check your RC channels in Betaflight to ensure that the arm switch does not activate the buzzer.
should I connect to +b or -b ?
one set of instructions showed -b, but you seem to show +b