


Exclusive Banggood Coupon Codes
▪ For our readers we have received exclusive discount coupon codes from Banggood, with which you can save up to 25% when buying Mavic, Spark, Mini FPV Racers and accessories such as Runcam Split, FrSky XLITE, antennas, etc. You can find these coupons on our coupons page. This section is constantly updated, so check back often.
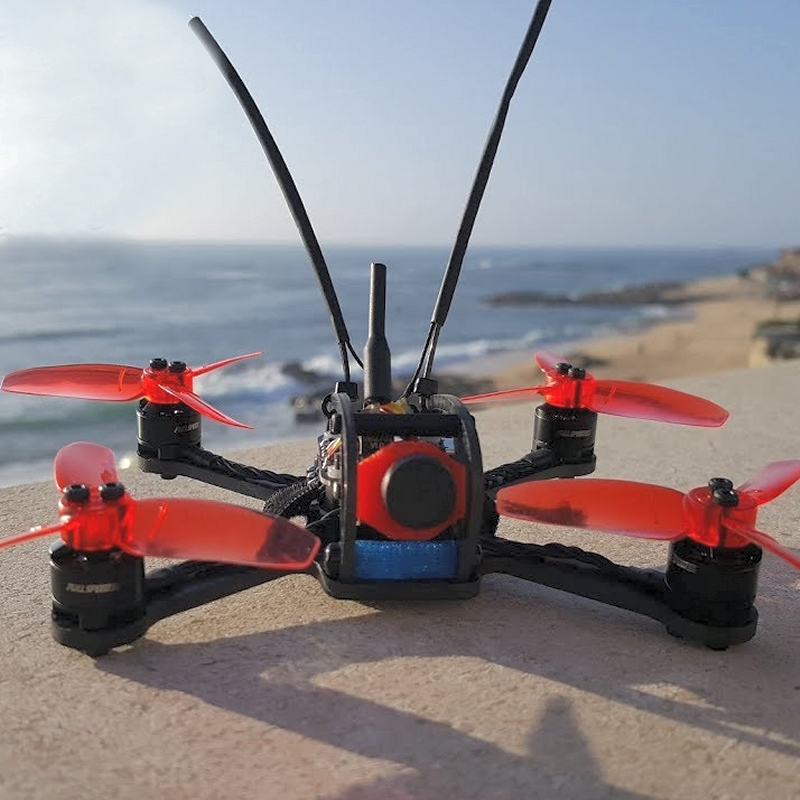
Finally there is a new cult racer! After the awesome KingKong 90GT some pretty decent Mini Racers came out, but this one really rocks. With the Full Speed Leader 120 – that flies with 2S, 3S and even 4S batteries! – we have a new winner that performs like the devil on speed!
Full Speed Leader 120 Mini FPV Racer
Index:
Page 1: Review
Page 2: Modding
Page 3: Betaflight
Page 4: Lipo Comparison
Page 5: Videos
Full Speed Leader 120


Caution, two versions!
With the Leader 120, the manufacturer Full Speed introduces a 120mm Mini FPV Racer that flies with both 2S and 3S (and even 4S – on the papers, at least). As the Leader was introduced, the reviewers were overwhelmed with enthusiasm about the great flight characteristics, the good handling and the enormous power, even with “only” 2S lipos used.
Shortly afterwards, however, there were the first reports of the Leader 120 performing so-called “roles of death” under full throttle, simply tipping over to the side and falling out of the air. The reviewers were quite baffled. Manufacturer Full Speed, however, responded quickly and took care of this problem, which became known as FOD (“Flip of Death”). The manufacturer gave the Leader 120 better engines and – this may have been the cause of the problem – 20A ESC, instead of the previously installed 10A. This seems to solve the problem and nothing negative is known yet about the new 20A version.
We also have the new 20A version of the racer in the test. These are currently available on Banggood. If you are not sure if you see the old or new version at a retailer: pay attention to the ESC’s ampere specification. 10A is the old version, 20A is the new and improved version.
Features
| Features at a glance: |
|---|
| Comes with OSD! |
| Can be used with 2S / 3S / 4S lipos! |
| 7500KV brushless motors |
| Carries up to 70mm propellers |
| Betaflight F3 6DOF flight controller |
| 20A BLHELI_S ESC, capable up to DSHOT600 |
| Plenty of power, superb flight characteristics! |
| Betaflight 3.2 compatible (dynamic filters) |
| Can be equipped with Runcam Micro Swift |
| Simple to mod |
| Comes as PNP (no receiver), compatible with PPM/SBUS/DSM receivers |
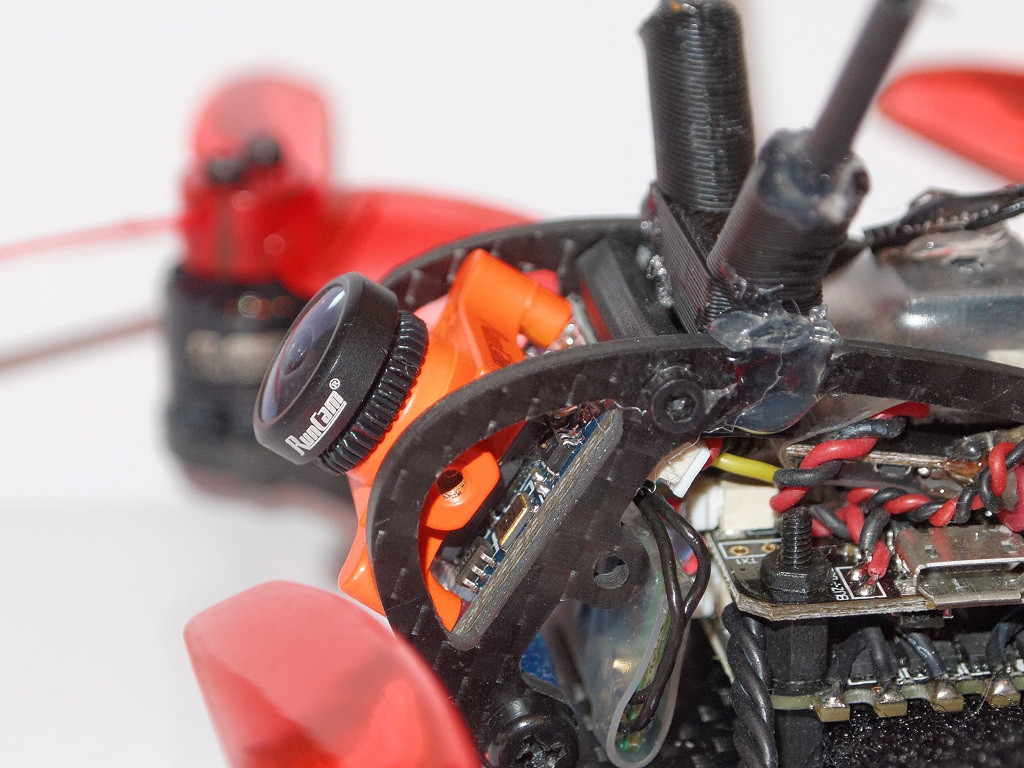
The Leader 120 comes with a 3mm carbon frame, 1104 7500KV motors, 20A BLHELI_S ESC (DSHOT600 capable), a Betaflight F3 Omnibus flight controller with OSD, a mediocre camera (can easily be replaced with a Runcam Micro, see “Modding” below) and a 25mW transmitter. If you prefer a better range, you can easily replace the original VTX with 200mW VTX03 (see “Modding”). A buzzer is already installed (great!), on which there is also a LED that flashes cheerfully in time with the beeper. There is a connection for an additional LED strip on the board.
Attention: The Leader 120 comes without any receiver – which is an advantage in most cases so you can simply place your own favourite receiver (in our case the FrSky XM+). Advantage of the ultra-compact FrSky XM+ receiver: fits perfectly, offers full range, diversity and RSSI (real-time display of the reception strength via the OSD). So if you have a FrSky compatible TX (e. g. Taranis or Devo 10) you should definitely grab an XM+.
The Leader 120 differs from the KingKong 90GT mainly in its larger frame – and this allows the Leader to use 70mm propellers. In combination with the powerful 2S – 4S 7500KV engines, the leader can develop a considerable thrust which the KingKong simply can’t reach by far.
The fact that the leader has an OSD (and also a barometer, for your interest), is also a huge improvement over the KingKong. The PIDs can be easily adjusted via OSD now, right on the field instead of carrying a laptop around. If you have installed an RSSI-capable receiver (e. g. the FrSky XM+), you can always see the current reception strength on the OSD – and thus know at any time how far you can fly before the connection gets too weak.
An OSD is essential because it indicates in real-time how much mAh you have already flown. So you always know when it’s time to land, no matter if you’re using a 450mAh, 850mAh or other lipos. You don’t have to fly stubbornly to the timer anymore, because you can always see how much capacity is still in the battery. Once OSD, always OSD!
In short: the Leader 120 has all the prerequisites for a perfect mini racer: light weight, big propellers, powerful engines, runs with 2S and 3S (even 4S are mentioned, but nobody has dared to do that yet. ), an OSD, comes with a buzzer and an LED strip can be easily attached.
A Runcam Micro Swift (currently the best choice for FPV cameras on mini racers) is also easy to install! Sounds great so far – but how does it fly?
Flight Characteristics
The “locked-in” feeling is perfect – the Leader 120 flies ultra-precise, you almost get the feeling as if it was totally weightless. But the Leader has a huge advantage to the KingKong 90GT, which flies ingeniously as well: its power! If you had to remember to accelerate the 90GT in time after a dive, so that you don’t drive it into the ground, you’ll notice with that you can fly much more relaxed with the Leader 120, because it has just enough power reserve to catch itself from a dive at the very last moment. And that’s even with 2S!
But with 3S, the leader is going to add another dimension of power, it literally becomes a little rocket! 4S would still be inside the specs (well, at least on paper). When choosing the batteries, you should not use lipos that weigh more than 50-60 Gram, otherwise the flight characteristics will suffer and the leader doesn’t steer as easily. With a light 2S 450-800mAh or 3S up to 500mAh it performs great!
The leader can be easily upgraded to the current Betaflight version (3.2.1), so that you can use the new “Dynamic Filter” feature – that’s exactly what we did. The setup is the same as before – the motors didn’t warm up and the Leader 120 flies better with the dynamic filter than before. We couldn’t produce any prowash on our flights. We really tried hard though. Wow.
Some Drawbacks
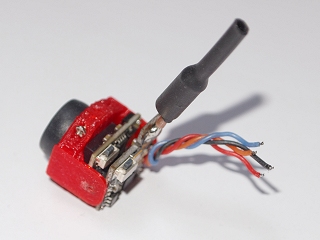
The Leader 120 seems to a perfect match so far. But are there any drawbacks? Actually, yes… and that’s an old friend of mine: the built-in camera. Unfortunately, this is only mediocre in terms of image quality and light sensitivity. Under Californian sun this may hardly be noticeable, but whoever flies in northern regions or under cloudy skies is, as usual, rewarded with a muddy and dark picture that lacks of colour and contrast. At dusk, the original camera does perform absolutely poor.
Also the video 25mW transmitter is not a perfect match either. Not because of the low transmission power (25mW may be still sufficient in some situations) but because of the modest transmission quality. The video transmitter is mounted piggyback on the camera. An elegant solution, actually. However, there are three clear disadvantages of this method: because the transmitter sits directly behind the camera, it can only be tilted upwards to a limited extent until it hits the flight controller. And the antenna of the video transmitter disappears between the side parts of the carbon frame – which results in a great loss of transmitting power. We had dropouts with the original cam/transmitter combo in an open field and within a range of 30 meters. That sucks.
Third disadvantage of the piggyback combo: if you only want to replace the camera, you have to replace the transmitter as well (and vice versa) since both are plugged together. There are no wires at all and you really don’t want to mess around with such small soldering points. So either change both or stay with the original cam and the original VTX.
Fortunately, the Leader 120 can be easily equipped with a Runcam Micro Swift, as well as a 200mW VTX03 transmitter. Do so and you really have a perfect picture with a good range.
How this is done is shown on the next page.
Summary
Finally there is a mini racer again which does (almost) everything right in terms of both, features and flight characteristics. And the few things that are to be criticized (camera and video transmitter) can be eliminated with little effort.
The Leader 120 is currently available as the new and improved 20A version for just around 100 EUR at Banggood. This makes it very, very attractive. If you are looking for a really great mini racer that offers modding potential and ingenious flight characteristics and can fly with both 2S up to 4S, you should definitely add the Leader 120 to your fleet.
The Leader 120 flies as precise and agile as the KingKong 90GT – but is superior in many aspects. Due to its bigger propellers, the Leader offers a lot more power, flies great with 2S and 3S, comes with an OSD and has room for a Runcam Micro and a stronger video transmitter – much more modding potential than the 90GT has. So is the leader the long-awaited cult successor of the 90GT and the new king among the mini racers?
Definitely yes!
Next page: Leader 120 Mods – Adding a Runcam Micro Swift and a 200mW VTX
Full Speed Leader 120 Mods
Index:
Page 1: Review
Page 2: Modding
Page 3: Betaflight
Page 4: Lipo Comparison
Page 5: Videos
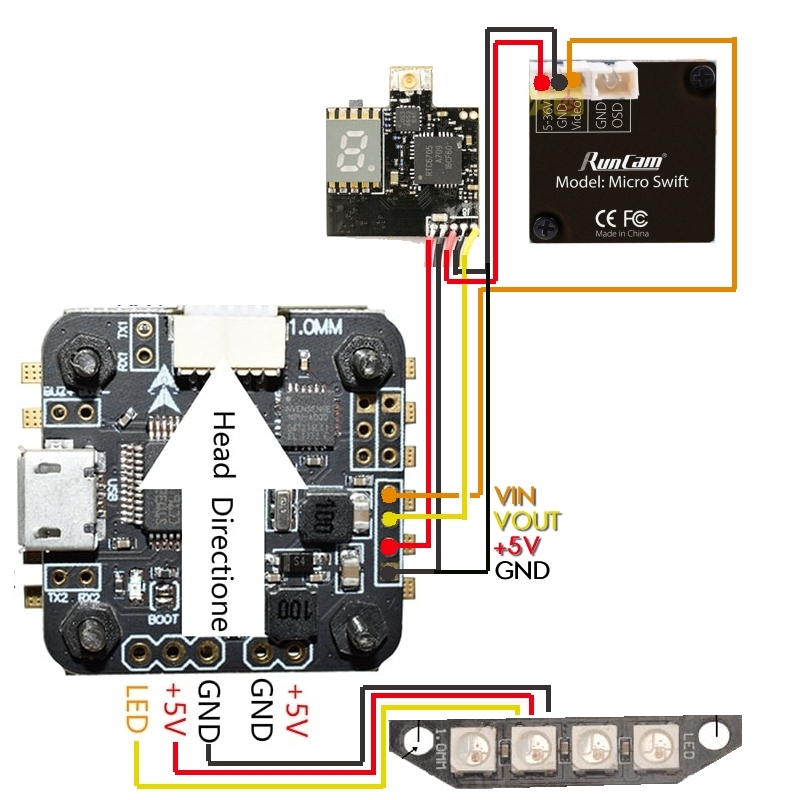
Adding an XM+ Receiver, Runcam Micro Swift and VTX03
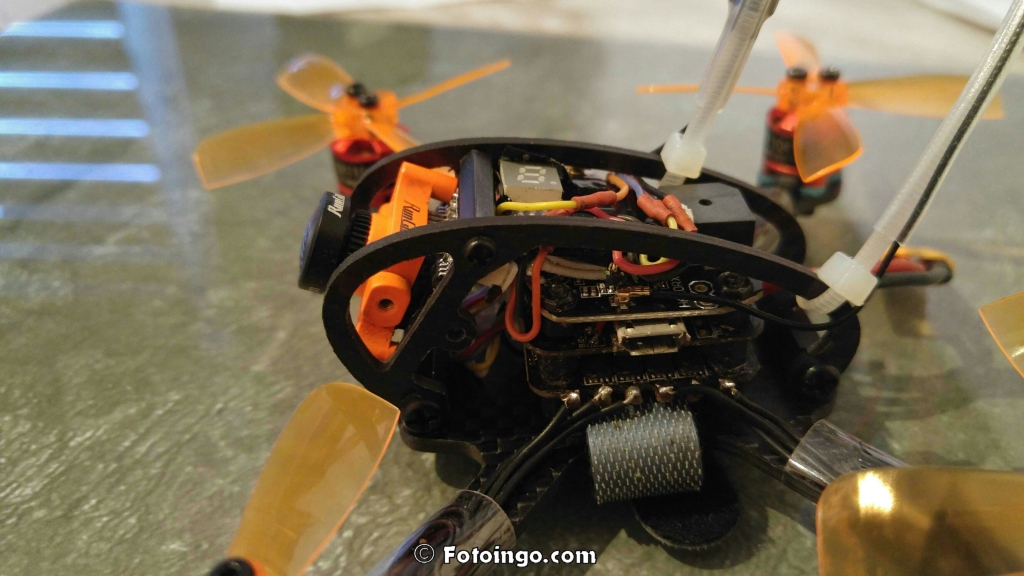
Attaching an alternative cam, a stronger video transmitter and also an LED strip is quite simple. All soldering points are easily accessible after unscrewing the two side parts. The board (a “Mini Omnibus F3”) has a very clear design:

Therefore, the wiring of an VTX03, a Runcam Micro an a LED Strip looks as follows:
➡️ Tip for a better video image:
If you look closely on the picture above, you will notice that the GND pin of the cam is not only connected to the GND pin of the video transmitter, but also additionally to the OSD GND on the flight controller. So the cam is “double grounded” with both, the VTX and the OSD. Why is that? If the cam is connected to the VTX GND only, stripes, noise or ghosting effects may be visible in the video image. Therefore it is always recommended to “double ground” the cam with the VTX GND and the OSD GND. A nice little trick, which is unfortunately quite unknown, so many pilots fly with a lousy video image, blaming the video transmitter or unnecessarily solder bulky low ESR caps on their quad.
To mount a receiver, camera and video transmitter on such a small racer, it is helpful to be an experienced Tetris player. But don’t worry – there is enough space available, you just need to know where to place everything. Since pictures say more than words, a look at the following photo should point you into the right direction:
Runcam Micro Swift
To hold the Runcam Micro Swift, there is a simple yet ingenious trick: simply unscrew one of the side plates and place the Runcam between both side plates. Tighten the side plate again, finished! The Runcam Micro clamps tightly and securely between the two side plates then (see photo). It doesn’t even have to be screwed on and you can also adjust the angle to suit your needs by loosening one of the side parts, tilting the camera to your desired angle and tightening the side plate again.
VTX
The VTX03 video transmitter is placed on top of the Flight Controller (see photo) – so that the antenna looks to the right (as seen from flight direction). This way, you can always access the channel switch of the video transmitter. Simply attach the video transmitter to the flight controller with a blob of hot glue. Attention: There are some quite fragile moduls soldered at the back of the VTX03 which could break off if you want to remove the transmitter again. Therefore, place the VTX03 within some transparent heat shrink tubing before gluing!
If the video transmitter is sitting on the FC, the antenna is simply folded back. In order to make it point up, glue a cable tie onto the video transmitter (therefore it is good that we have wrapped the VTX with a shrink tube), bend the antenna of the video transmitter upwards and insert the cable tie into the antenna so that it always points upwards.

Picture: The video transmitter, packed in a transparent shrink tube, sits on the flight controller. The buzzer is affixed to the VTX (also sitting within the shrink tube). The antenna of the VTX03 is pointing outwards (through the side part of the frame) and is held up with a cable tie piece.
Buzzer
The Leader’s buzzer fits perfectly on the video transmitter and is glued with a blob of hot glue or an adhesive pad. Please do this BEFORE you insert the video transmitter into a shrink tube. The beeper sits on the video transmitter (also underneath the transparent shrink tube) then. To still hear it beeping, cut a small hole into the shrink tubing, exactly where the hole of the beeper is:
Receiver
The receiver, if it is the size of a FrSky XM+, can be packed between the Runcam and the flight controller. Fix it there with a blob of hot glue. There is also an ingenious trick for the two antennas of the receiver: just wind a cable tie around each side of the leader. They should look up. The antennas can then be attached to these (e. g. with adhesive tape).
Instead of using cable ties, you can also use a 3d printable antenna mount available for download at Thingiverse.
LED Strip
An LED strip (e. g. the one from the Eachine XQ95, which is cheaply available at Banggood) is also quickly installed: the corresponding three soldering points are conveniently located on the back of the board. Just solder on the LED strip and fix it to the frame using some hot glue:

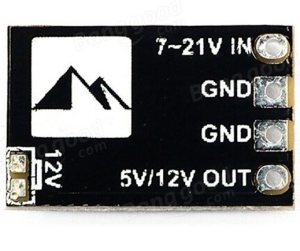
Hint: Use a 5V BEC
Some LED strips consume a relatively large amount of power. Therefore, the flight controller board can reach its limits – especially if it is operated with a 3S Lipo. If the 5V converter on the board cannot supply enough voltage for all connected components (camera, video transmitter, LED strip, receiver), it can happen that the quad flips to the side at full throttle and falls happily out of the sky (“roll of death”).
Therefore LED strips should always be operated with a 5V BEC (e.g. this one or this one).
The “In” pins of the BEC are simply soldered directly to the lipo contacts. The “Out” pins of the BEC then provide 5V and can be loaded with up to 2 or 3 amps, which is sufficient for LEDs and relieves the FC board a lot. Just solder the GND and 5V cable of the LED Strip to the “Out” pins of the BEC. The signal cable of the strip remains connected to the Leader’s board. If one only flies with 2S, this is not absolutely necessary, but as already mentioned, the FC Board is relieved and this practice therefore is basically advisable for every Mini Quad.
Next page: Betaflight settings
Full Speed Leader 120 PIDs
Index:
Page 1: Review
Page 2: Modding
Page 3: Betaflight
Page 4: Lipo Comparison
Page 5: Videos
Betaflight Settings
The Leader 120 comes with an older Betaflight version, but the version 3.2.x can be flashed without any problems – it requires the firmware OMNIBUS (OMNI) 3.2.x -. Before installing a new version, however, you should make a backup of the original settings on the CLI page of the Betaflight Configurator using the “dump” command. Just to be safe.
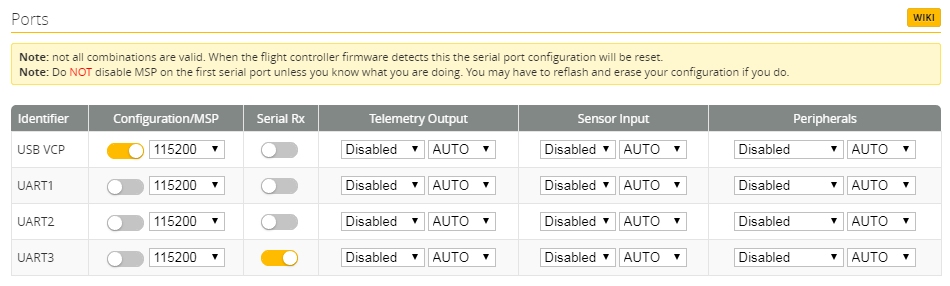
After flashing the firmware, first enable the correct receiver port. In this case UART3:
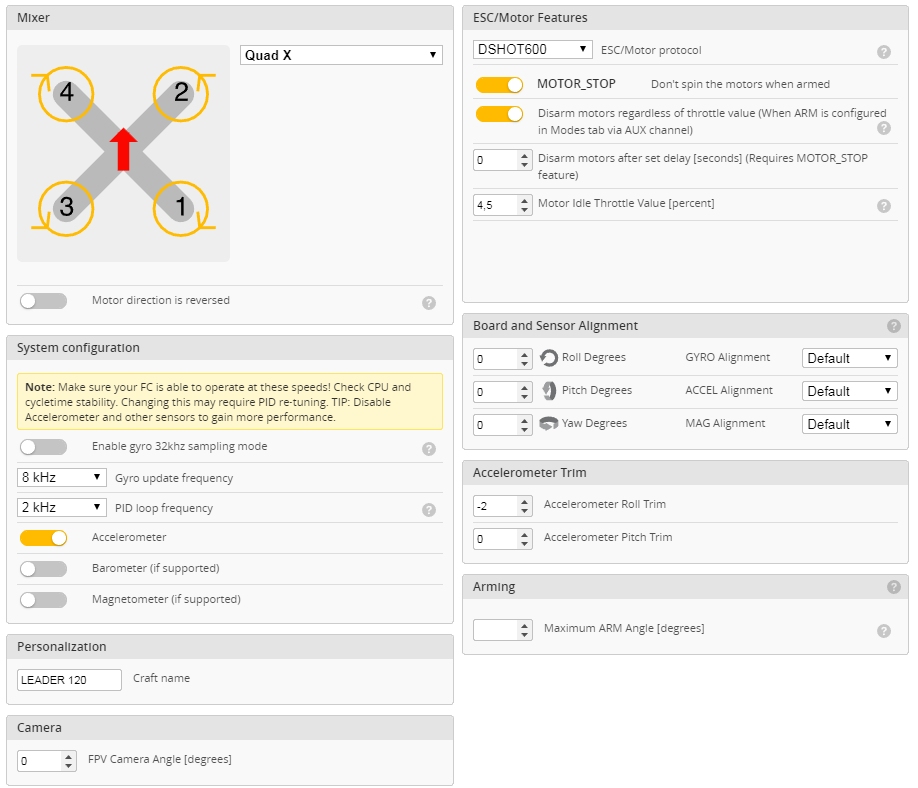
As ESC protocol you should select DSHOT600 and set the gyro update and PID loop frequency to 8 / 2 – 8 / 4 would also work, but at the expense of an increased CPU load. However, since we want to use dynamic filters which needs a a good amount of CPU load on an F3 board, we want to keep the CPU load as low as possible.
Therefore, let’s deactivate all the features that we don’t really need, especially the barometer. The barometer installed on the F3 is not really accurate and quite useless for a racer. So just deactivate it.
If fly in acro mode only, you can also deactivate the accelerator feature. In this case, however, it is no longer possible to fly in stabilized mode. The processor load (to be seen at the bottom of Betaflight) should not exceed 20-30% in idle mode. Then there is enough power for the dynamic filter. With an F4 board you wouldn’t have to worry much about this, but with an F3 the computing capacity is still a bit limited.
Important: on the “Settings” page, the “Dynamic Filter” feature must be activated. That’s what we want to use, so make sure to activate this feature.
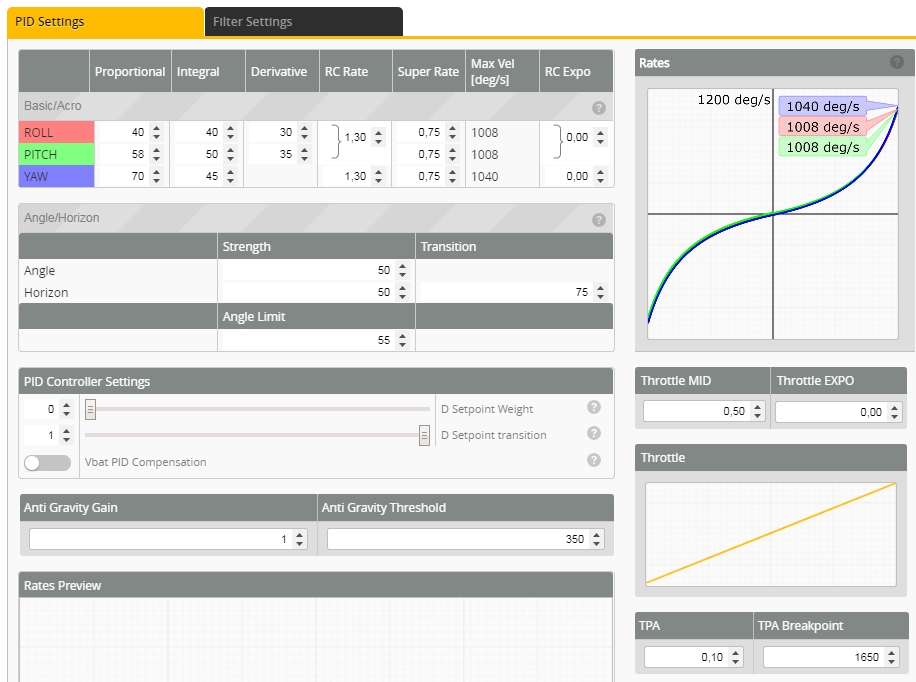
With the standard PIDs of Betaflight 3.2 the Leader 120 performs excellently, so we can leave them as they are for now. I personally prefer quick and crisp rates, but that’s a matter of taste:
Now to the settings of the dynamic filter, which we activated on the “Settings” page. Its settings can be found on the same page as the PIDs, under the “Filter Settings”tab. Change the filter settings there to:

These settings are still moderate, but the Leader 120 doesn’t show any propwashes with them. If you want to optimize even a bit more, you can set “Gyro Notch 1” and “Gyro Notch 2” to 0. Then remember to check the motor temperature on the first flight! So first hover for a few seconds, land again, check the motor temperatures. If they are cold or lukewarm, fly for a minute. Land again and check the motor temperature again. If the engines are still cool, everything is fine.
It is important to note that if the filters are set incorrectly, the motors can overheat very quickly and even burn out! So first check whether they become warm during operation!
Auf der nächsten Seite: Mit welchem Akku fliegt der Leader 120 am besten?
Full Speed Leader 120 Lipo Comparison
Inhalt:
Page 1: Review
Page 2: Modding
Page 3: Betaflight
Page 4: Lipo Comparison
Page 5: Videos
Leader 120 Lipo Comparison
Which battery weight is ideal for the Leader 120? We have tested the most common 2S and 3S lipos to find the ideal battery weight for the Leader 120, which allows you to fly as long, but also as agile as possible.
Of course, the flight time depends on your personal flying style. In our tests we flew quite fast and with a good use of the throttle stick. In every flight and with every battery we performed many loops, flips and punches. The flight times we received can thus be significantly extended if you fly in a relaxed and smooth manner. If you don’t accelerate too much, you could easily add 1-2 minutes to the flight times for each result in the following table:
| Leader 120 Lipo Comparison | ||||
|---|---|---|---|---|
| Lipo: | C-Rate: | Weight: | Flying Time: | Feeling: |
| 2S Tattu 450mAh | 75C | 29g | 3:00 | feathery |
| 2S Tattu 650mAh | 74C | 38g | 4:00 | very manoeuvrable |
| 2S Tattu 800mAh | 45C | 43g | 5:20 | quite manoeuvrable |
| 2S Nano Tech 850mAh | 25C | 49g | 5:40 | quite very manoeuvrable |
| 3S Tattu 450mAh | 75C | 43g | 3:40 | feathery |
| 3S Tattu 650mAh | 75C | 54g | 4:30 | very manoeuvrable |
| 3S Tattu 850mAh | 75C | 86g | 4:30 | noticeable weight |
| 3S Floureon 1000mAh | 20C | 83g | 4:30 | noticeable weight |
Results
2S batteries for the Leader 120 should preferably not weigh more than 50g. The more capacity (mAh) you get below this weight, the better. According to our test, the discharge rate (C-rate) has less influence on the Leader’s flight behaviour.
3S batteries are allowed to carry a little more weight, as they provide more motor power due to the higher voltage rating. Nevertheless, our test shows that the limit is reached at about 55g. Above that, you feel the additional weight on your sticks. Everything underneath flies great. The ideal 3S battery for the Leader 120 has a maximum of 55g on the scale, but with as much mAh as possible to ensure a good flight time.
By the way, we also found that a Lipo can be too light of weight instead of too heavy. When flying the 2S 450mAh battery (only 29g) the Leader was so lightweight that it literally sucked itself into the air and didn’t want to come down again. This makes some manoeuvres quite difficult, because you can’t use the racer’s weight if you want to quickly lose some altitude. With a too light battery, it’s hard to do this – you literally feel like you’re standing in the air.
The ideal candidates are therefore:
Best 2S Lipo
Reach for the Tattu 2S 800mAh. This one comes with an ideal weight and allows an acceptable flight time. If you only want to spend half the money, you’ll even get 50 mAh more capacity (but also a few grams more weight) by choosing the HobbyKing Nano-Tech 2S 850mAh. It offers “only” 25C, but there is no earth-shattering difference between the Nano-Tech 850 and the Tattu 800. Both are great 2S lipos for the Leader (and most other mini quads as well). With a Nano-Tech 850 we have even set a flight time record with the Leader: more than 8 minutes! However, this is only possible if you fly very relaxed and without any full throttle. Then it turns out that you can get a lot out of 850mAh.
Best 3S Lipo
Among the tested 3S batteries, the Tattu 3S 650mAh is the best choice. It is lightweighted enough to fly beautifully agile but also offers enough capacity for at least 4.5 minutes of flight time. With a relaxed flight maybe 1-2 minutes more.
The 850mAh Tattu doesn’t deliver a good result, because it comes with XT60 connectors and quite thick cables and therefore simply puts too much weight on the scales. In out test, the flight time did not increase beyond 55g of battery weight. The weight eats up any additional capacity then.
The two best 2S lipos come with JST plugs. So if you plan to fly 2S only with the Leader, you don’t have to change the battery plug, because the Leader is already equipped with a JST plug. The 3S Tattu comes with an XT30 connector. So if you want to fly 3S, you have to replace the Leader’s plug with an XT30 or a DIY adapter plug.
Those who prefer to fly more comfortably and are looking for longer flight times should choose 2S 800mAh lipos, such as the Nano-Tech from HobbyKing. With the 3S 650mAh the Leader 120 flies really wild and can be punched neatly. Power, speed and weight are very impressive here, but with shorter flight times compared to the 2S 800mAh.
Next page: Leader 120 flight videos
Full Speed Leader 120 Videos
Index:
Page 1: Review
Page 2: Modding
Page 3: Betaflight
Page 4: Lipo Comparison
Page 5: Videos
Leader 120 Videos
Articles in this category
Recent Comments
Leave a Reply
You must be logged in to post a comment.


Hey – great review and write-up. Great for noobs like me! I am struggling to find the Nano-tech 2S 850mAh batteries that weigh 49g though… the ones on the Hobbyking site are listed as 95g. Did they used to make a lower C rated version that was lighter?
Paul, see here: http://bit.ly/2sR2epi – 95g is the brutto weight. Netto weight is 49g (just the lipo with the cable), it's written in the description below there.
Doh! I was ordering the battery list by weight:)
Thanks, I'll get a few of those ordered
Will these settings work for a Frsky R-XSR receiver? I can't seem to get my TAranis talking to my receiver.
Thanks
I am using FrSky XM+ with all my micro quads since it is tiny and has full range, plus RSSI. That's all you need while flying with goggles. So I don't know about R-XSR, I'm sorry. There could be several issues: make sure you activated the correct UART in Betaflight and plugged the receiver to the correct pins on the FC. Protocol in Betaflight should be set to SBUS, too. That's the main things to do.
Thanks for that excellent Review!
Are the props suggestion for 2S -3Blade 2840 and for 3S 3025? …besides the originals draw to much amps and seem not available.
Are there further alternatives?
I am using the original props (with 2S and 3S) and they do very well so far. Motors don't get hot (not even warm) with them. However, some Leader owners complain about blackouts or reboots that may happen if the FC board cannot provide enough power for the VTX, RX, LED etc. This seems to be the case if a 200mW VTX is used (which draws more power than the FC's cheap 5V converter can handle). If this is the case, I'd just install a little 5V BEC (Matek, f.e.) that is directly plugged to the battery and powers the VTX, RX and LED. That should provide more stable 5V than the built in converter of the FC board.
Looking to buy the Flightcontroller that came with the leader 120
fired mind but everything is ok so need the FC .Anyone know were I can get and what is the Flightcontroller I need to purchase
Thanks a lot
Love this write up
Generally you should be able to use any F3 / F4 board that fits the frame's screw holes (20x20mm mounting hole distance), so you could chose one that fits your taste. Or even upgrade to a F4.
This one looks very similar though: http://bit.ly/2GlyLdF
Or drop an email to Full Speed and ask them about spare parts.
Thanks for the reply
I am new at this, the one thing I am confuse with is how to power the FC how do you know were 12v is
Thanks
@David – I am not sure what you mean with 12V, so here's a general guide:
Most FC's have a VBAT pin. The VBAT pin is used to power the FC directly from the battery (2S-3S for example, depending on the FC's specs). To power a FC, just connect it's VBAT and VBAT GND directly to the battery contacts -or- to the VBAT / VBAT GND pins of the PCB board.
Some FC's cannot handle full VBAT power. They are powered by 5V only. Then you have to use a power board that provides a 5V output for the FC. The Leader FC (and many other F3 FC's) should be able to handle full VBAT, however. "VBAT" always means full battery power as it comes from the Lipo.
Once the FC is powered, it reduces the full VBAT voltage to 5V (using an on-board module, called LDO) and sends the reduced 5V to all the 5V pins found on the FC board. All these 5V pins on the FC are called the "5V rail". These 5V pins on the FC can then be used to power the camera, VTX or an LED strip. You should keep the number of devices connected to the FC's 5V rail to a minimum, otherwise the FC might get too hot or won't be able to provide enough Ampere for all that devices.
So if your camera or VTX can handle VBAT (full battery voltage), you should connect them to the battery directly to reduce the power load of the FC. Most cams (such as Runcam etc.) and VTX can handle full battery power nowadays.
Hi, kannst du mir sagen wie das Update von Betaflight vonstatten geht? Muss man einen dieser USB Treiber installieren?
@Martin: falls dein Kopter über USB nicht von Betaflight erkannt wird, gibt es zwei Tools, die dir den USB-Treiber installieren: das eine heisst "Zadig", das andere "ImpulseRC Driver Fixer" (Google-Suche). Damit sollte der USB Treiber dann installiert sein. Hier ein Video dazu: http://bit.ly/2EVifkl
Das Update selbst geht dann über die Betaflight App. Diese App musst du im Chrome Browser installieren (Chrome starten, suche nach "Betaflight App" und diese installieren).
Wie man dann in Betaflight updatet, zeigen viele Videos auf YouTube, z.B. hier: http://bit.ly/2nXrhFv
Ist am Anfang recht viel zu lernen, ich weiss. Aber da muss man leider durch ?
Hi Mike, danke für die schnelle Antwort! Der Driver Fixer hat mir weitergeholfen und BF auf den neuesten Stand gebracht!
Lg
??
Hi Mike. Toller Artikel, danke dafür. Leider bekomme ich die Kiste nicht mit meiner QX7 gebunden. Der FrSky Receiver XM+ mit EU/LBT Firmware sollte richtig verkabelt sein. Taranis steht auf D16 Modus. Wenn ich binde, leuchten die rote und grüne LED am Receiver. Nehme ich den Strom weg und wieder dran, leuchtet nur die rote und nicts tut sich
Hast du ein paar Tips für mich?
@Michael: bist du dir sicher, das die passende Firmware auf dem Empfänger installiert ist? Ich gehe immer so vor (allerdings mit der Devo 10, nicht der Taranis):
1. Funke an
2. Bind Button am Empfänger drücken, Akku anschliessen.
3. Funke in den Bindemodus schalten
4. Nach dem Binden Funke und Empfänger ausschalten
5. Dann beide wieder einschalten, die sollten sich dann automatisch finden.
Jo, ich tausche Punkt 2 und 3. Ansonsten mach ich das auch so. Hat auch bis jetzt immer geklappt. Nur bei meinem Leader nicht. Ich denke auch es ist ein Versions Problem. Ich muß mich mal in das Firmware flashen Thema einlesen.
Kurze Rückmeldung nach dem flashen des XM+. Es lag tatsächlich an der falschen Firmware. Vielen Dank für deine Hilfe.
Klasse ??
Hallo Mike,
Auf dem Wiring diagramm steht unten rechts 5v+, bei mir ist dort dort aber vbat angeschlossen. Ist das Diagramm falsch?
Grüße Steffen
Hi Mike,
I bought the Leader 120 based on your review and I'm loving it. I'm using an FrSky R-XSR without any problems. However, I miss the FrSky telemetry and spoken battery alarm I have on my bigger quad. Do you know if the TX1 or TX2 pins on the FC can be used for Telemetry? I'd try it but I'm still quite new at this and have damaged enough electronics through ignorance to be worried about trying it without a good idea it might work.
Thanks
Peter
@Peter: I don't use Taranis myself, so I can't help you with this. I am using the Devo10 and FrSky XM+ with all my micro quads. The XM+ receiver has RSSI, which can be displayed in the goggle's OSD, as well as the voltage and mah consumption, so (in my opinion) there is no need for Taranis telemetry anymore in the days of Betaflight OSD.
Hello, friend! Is it possible to set up a beeper to search for a quadcopter? I tried to set up a betaflight nothing happens..((
Why the Max Vel Deg/s of yaw is bigger, despite the rates of pitch, roll and yaw are equal?