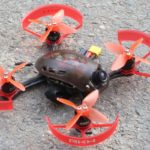
EACHINE LIZARD95 ANNIVERSARY EDITION
Index:
Page 1: Review
Page 2: Betaflight Setup
Page 3: Installing a Runcam Micro
Page 4: Lizard95 Speed Mod
Eachine Lizard95
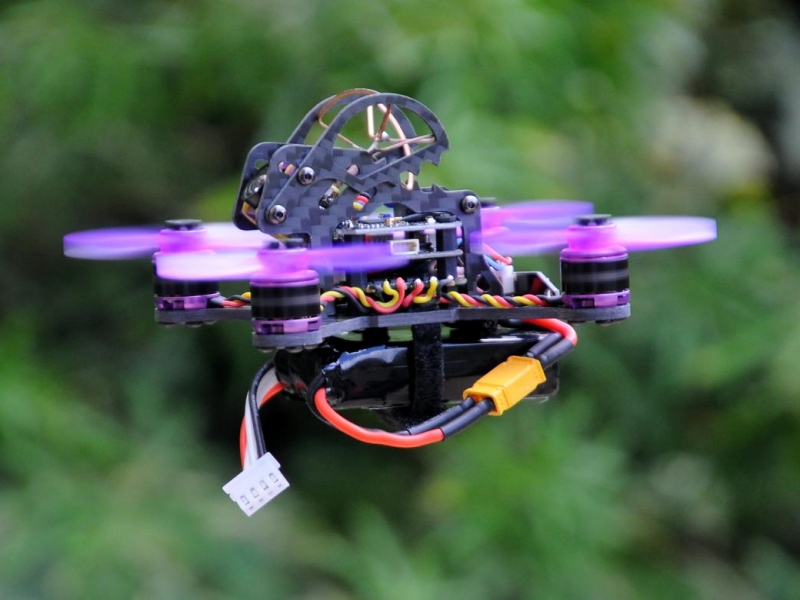
The legendary KingKong 90GT was the first Micro Racer that made a worldwide impact. Eachine’s Lizard95 now takes on this legacy – and makes it even better, as it comes with an on-screen display and can even fly with 3S. Very impressive for its size!
Exclusive Banggood Coupon Codes
▪ For our readers we have received exclusive discount coupon codes from Banggood, with which you can save up to 25% when buying Mavic, Spark, Mini FPV Racers and accessories such as Runcam Split, FrSky XLITE, antennas, etc. You can find these coupons on our coupons page. This section is constantly updated, so check back often.
In early 2017 the KingKong 90GT was considered a star in the Micro FPV Racer sky – and many still fly it. However, the technology has developed a bit further in the last year and whoever reaches for the KingKong today immediately notices the missing On-Screen-Display (OSD), which conjures up valuable information in the video glasses during the flight. Also that the KingKong can only fly with 2S Lipos is a pity. Especially with this small weight class you could really enjoy the power of a 3S battery.
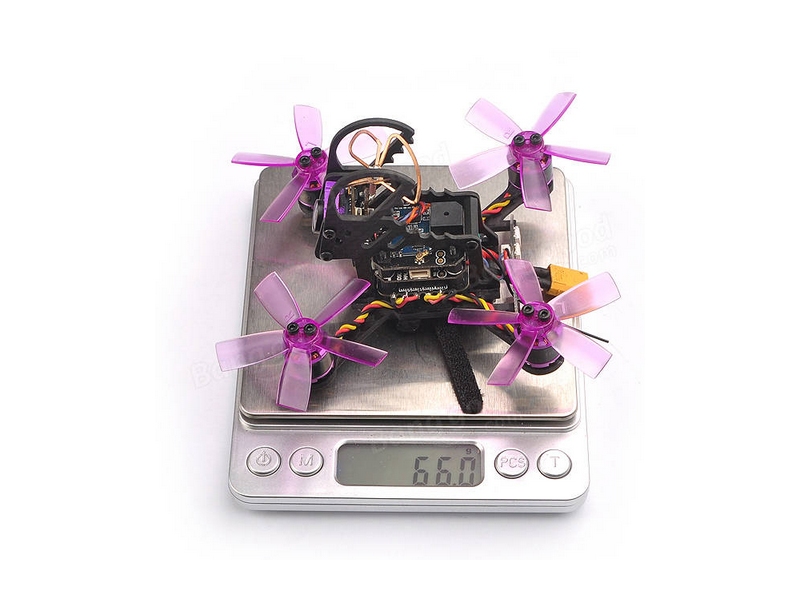
And this is exactly where the Lizard95 comes into play – more precisely, it’s Anniversary Edition. All the disadvantages of the KingKong seem to be solved with the Lizard95. An OSD is finally on board and the little now also swallows 3S Lipos. On 3S and with a weight of just under 70 grams, the Lizard flies like a guided missile!
? Some Lizard95 pilots equipped with a radar gun measured this little quad with 70 mph – the Youtuber Alber Kim even managed to get it on nearly 100 mph, with slight modifications only (see this article)! This shows the potential of this small, ultra-light 3S racing bullet!
Equipment
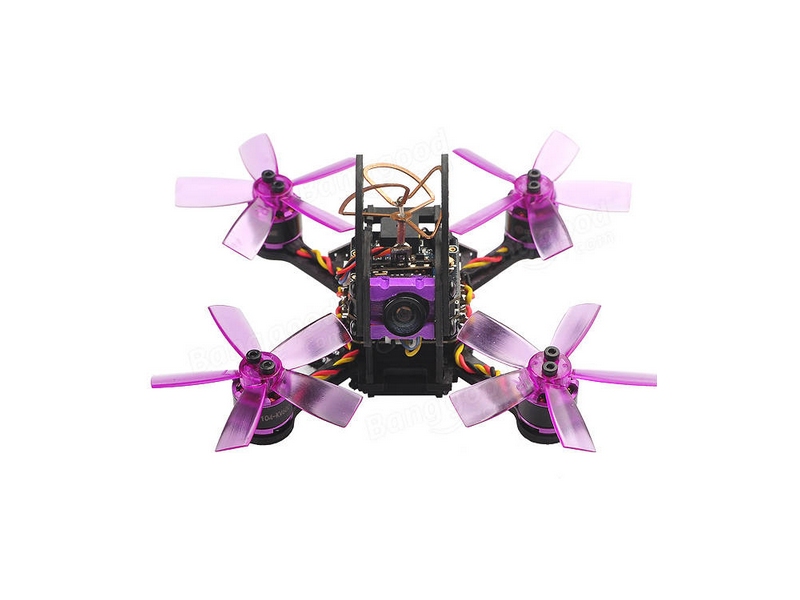
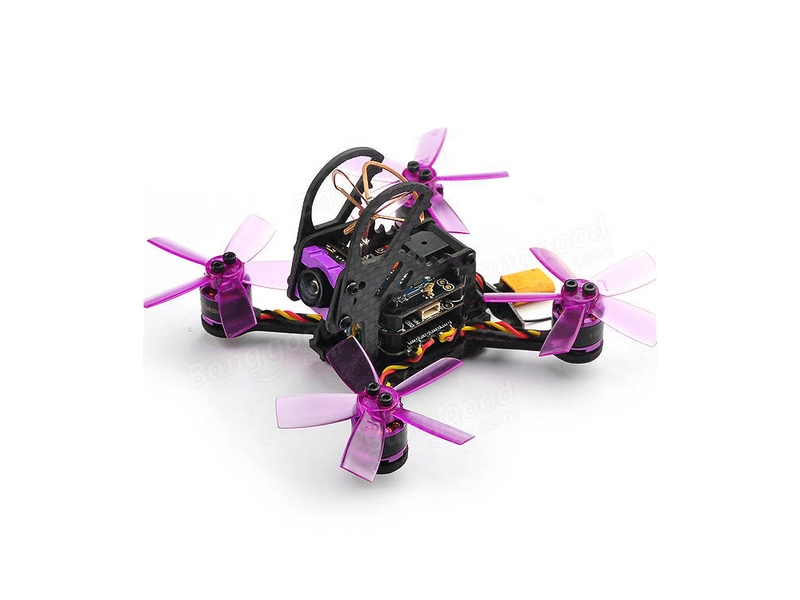
The Eachine Lizard95 is a flyweight of just under 70 grams and can be flown with both 2S and 3S Lipos. The equipment of the Lizard is quite passable for a Micro:
The 48-channel video transmitter can be switched between 25mW and 100mW. 200mW would be better (at least on paper), but with a 2S Lipo this would draw relatively much current and provide a hot video transmitter. With a Micro FPV Racer, 100mW is usually enough, because you don’t fly around half the globe with a micro FPV racer.
The built-in 600TVL FPV camera is better than the KingKong’s, but does not come close to a Runcam Micro Swift. However, the Lizard95 can be easily upgraded with a Runcam Micro and a VTX03 video transmitter. The video transmitter and the FPV camera are plugged together piggyback.
The Eachine 1104 KV6000 motors can be flown with 2S and 3S lipos, the BLHELI_S DSHOT600 4-in-1 ESC can handle a peak of up to 15 amps. According to the data sheet, the F3 flight controller is preflashed with Betaflight 3.1, but some copies also have been delivered with Betaflight 3.2 yet. Betaflight 3.3 seems to be a bit buggy atm, so we would not recommend to install a higher version anyways.
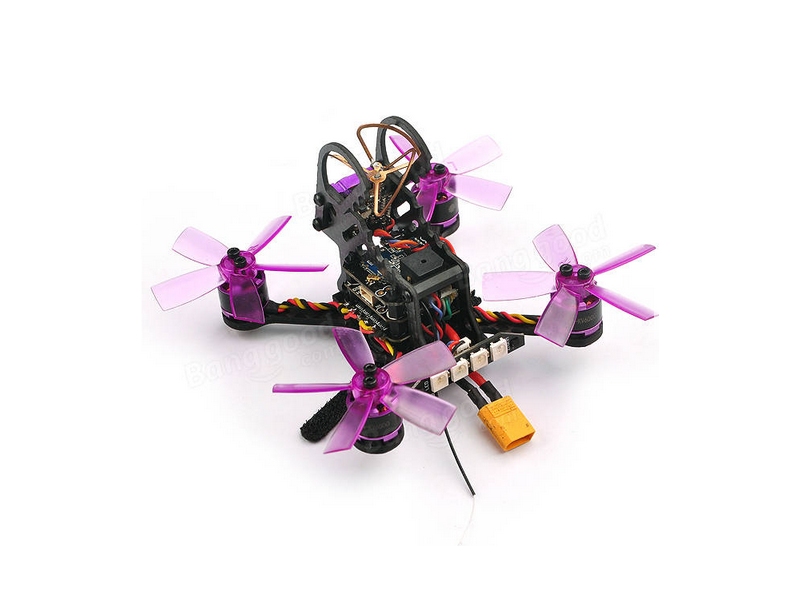
An XT30 connector is available to connecting a 3S Lipo. An advantage for everyone who wants to fly the Lizard with 3S. If you prefer fly it with 2S Lipos (which usually come with a JST plug), you can make an adapter with little effort.
Gratifying: a handy buzzer, as well as a programmable LED strip is already installed.
| Lizard95 Features: | |
|---|---|
| Flight Controller | Omnibus F3 Betaflight, 20x20mm (M2) |
| Motors | Eachine 1104 6000KV |
| MCU | STM32 F303 MCU |
| OSD | Betaflight OSD |
| Buzzer | ✔️ |
| LED Strip | ✔️ |
| Receiver | FrSky D8 / FlySky 8CH / DSMX |
| ESC | BLHeli_S 16.5 15A 4-in-1 DSHOT600 |
| Camera | 600TVL |
| VTX | 48 Channel 25/200mw |
| Plug | XT30 |
Our Impressions
In fact, we got a Lizard95 with Betaflight 3.2.0 pre-installed, so the newer ones are probably already updated. That’s good. I have had mixed experiences with Eachine so far, so I was quite sceptical about the test. But after a few flights it became clear: the Lizard95 is a speed monster and really a lot of fun!
Speed
Clearly, the Lizard95 Anniversary Edition is the fastest mini racer we’ve ever flewn yet! With a 3S lipo this little thunderbolt accelerates like a Tesla car! You almost have the feeling of being pressed into the seat while accelerating. I have never experienced such a massive acceleration in the lower third on any other micro and mini quad. The Lizard95 is indeed a small rocket – and buzzes even better than the Leader 120, my previous long-term favourite.
In the test we whipped the quad with 3S 650 lipos and had a lot of fun – the acceleration, the hang times, the top speed – the Lizard95 flies remarkably well. So it is simply fun to whip the little one through the sky. We have never experienced such an agility, punch and speed with a micro quad and here the Lizard95 even beats the Leader 120. Awesome.
Of course the fun with a 3S 650 Lipo is over after only four minutes, depending on how wild you fly. But that’s okay. Maybe the Lizard could also use a 3S 800, but it wouldn’t be as agile as with the 650s or the 550 lipo. For those who prefer longer flight times and also like it a little more comfortable (for indoor flying or in close areas), a 2S 600 – 850 Lipo would also be recommended.
Flight Duration
The measured flight times were the same with both the enclosed 5-blade propellers and the Gemfan 2035 4-blade props, there is no big difference here. With a 3S 650 Tattu Lipo (54 grams) the Lizard95 has a flight duration of 3:30 to 4:30, depending on how hard you take it, which is quite good considering how lively and agile it is. Other racers, who bring less top speed and acceleration, usually only get less than three minutes. The 3S 650s seem to be the ideal fuel for the Lizard.
With the included 3S 550 Lipo from Eachine it flies even more agile (a real pleasure!), but the fun is 30 to 60 seconds shorter then. So if you want to get the last bit of speed out of the Lizzy, you should reach for a 3S 550. If you are heading for a good mix between flight duration and agility, get a 3S 650.
We have also tested 2S 850 Lipos with the Lizard. Contrary to our expectations, they do not offer a longer flight time compared to the 3S 650, but significantly less agility and top speed. Nevertheless: who flies indoors, in the park forest, as a beginner or prefers it slower for some reason, can definitely reach for a 2S Lipo. But the Lizard is clearly designed for 3S. The little one wants to run, not go for a walk!
| Battery | Weight | Flight Duration | Agility |
|---|---|---|---|
| 2S 850mAh | 48g | ~4 min. | Lazy |
| 3S 550mAh | 45g | ~3 min. | Very high |
| 3S 650mAh | 54g | ~4 min. | High |
Receiver
We have chosen a FrSky receiver. Unfortunately this is directly soldered onto the flight controller. The replacement therefore requires more effort than usual. That’s why we left the installed FrSky 8-channel receiver on it instead of replacing it with a FrSky XM+ as usual – and we were pleasantly surprised. Like the XM+, the receiver supports RSSI and is better than we expected. The reception strength in our test was still about 50% at a distance of 500m. This is absolutely sufficient for a micro racer. Instead of two diversity antennas, it comes with only one antenna, which is a good 20-30cm long. Before the start you should glue it well, so that it can not get into the propellers.
Vibrations?
Some reviews criticized, that the Lizard95 shows some vibrations at full throttle and the engines would run quite hot. However, we cannot confirm this! With Betaflight 3.2.0, the preset PIDs, a 3S 650 Lipo and the 5-blade stock props, it flies just great – not a trace of vibrations, even at full throttle. The engines just get hand-warm, even when you whip the Lizard, like the devil. So it’s all good. For our test we have only activated the dynamic filter in Betaflight. All other settings are set to default.
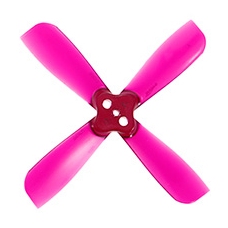
Gemfan 2035
Video Transmitter
The VTX was already set to 100mW by default. Channel selection and switching between 25mW and 100mW is done by a small dipswitch on the VTX and is quite simple. A paper note included with the Lizard95 explains how to use the video transmitter.
The reception of the video image is – contrary to our expectations – absolutely solid and showed hardly any dropouts during our test flights. In some reviews the reception was still criticized and speculated whether the carbon side parts, which are supposed to protect the FPV antenna, probably influence the transmission quality. We could not find this out at all – but that the channels of the VTX specified in the manual do not correspond to the actual channels. It may be that some users think they have set the VTX to the right channel because they receive an image in their goggles, but instead they are on an adjacent channel. And this leads to significantly worse video transmission in flight. So make sure you are on the right channel!
The reception is perfect and even much better than many micro and minis that come with a small whip antenna. There is absolutely nothing wrong. The carbon side panels should therefore remain screwed on to protect the antenna. Since these are screwed on, however, they can also be removed without any effort.
Speaking of antennas: the short middle bridge that connects the upper and lower “cloverleaf” of the antenna is very fragile and likes to break. So if you have image dropouts, it may well be that this small bridge has already said goodbye. It happened to us after a short time. This is, assuming a little skill with the soldering iron, relatively easy to repair. This video explains how. Or just replace the Cloverleaf antenna with a whip antenna that can hold out much more.
Any Cons?
So far we are absolutely enthusiastic about this small Porsche – but there are two shortcomings to complain about. Firstly, the poorly placed solder points of the motor cables on the ESC pins. These are so fragile and poorly soldered that three of them went off as we replaced the lipo strap! Before the first flight it is therefore strongly recommended to check the motor cables. Re-solder them by yourself. If you do not like soldering, it is better to secure the contacts or cables at the contacts with a trace of hot glue before flying. Because these cables will certainly be the first to come loose in operation.
The second flaw in the Lizard95 that struck us is once again – who would have guessed it – the FPV camera. Okay, we’ve seen a lot worse here. But for Runcam Micro Swift spoiled eyes, the Lizard95’s stock cam is poles apart. In sunny weather the picture is quite okay, but not very detailed or crisp. Smaller branches and twigs are difficult to see. In addition, the area in the middle of the video image is constantly overexposed, so that there is a bright and somewhat overexposed area around the center. We have also seen a lens mirroring in flight – something we have never seen before with any other FPV cams. The colors itself, however, are well-balanced.
You can fly with the Stock Cam, yes – but more demanding pilots should sooner or later consider to replace it with a Runcam Micro Swift.
Conclusion
As I said – Eachine is usually not one of my favorite brands, so we were quite sceptical about the test. But sometimes you can be mistaken. The Lizard95 flies brilliantly, with 3S it literally goes off like a rocket, binding the receiver was no problem at all and the pre-installed PIDs are great. Apart from the soldering of the motor cables on the ESCs, the workmanship of the Quad looks very solid and well thought-out.
In fact, the Lizard95 Anniversary Edition is one of the few micro racers that doesn’t require much modding and is ready to go just out of the box. A buzzer and an LED strip are already installed. The vibrations with the stock props criticized in some reviews we could not be reproduced in out tests.
Apart from the mediocre camera and the soldering points of the motor cables we can’t say anything bad about the Lizard95. This little quad flies incredibly with 3S and is such a lot of fun. It has also a very unique sound. With the stock props the Lizard “whistles” like the turbocharger of a sports car. It’s fun!
The Lizard95 Anniversary Edition breaks the speed record of all our tested quads so far! With the Lizard95 Anniversary Edition, Eachine has created a true new cult racer that is more fun than both, the Leader 120 and Babyhawk-R – because the Lizard is incredibly fast, incredibly agile, incredibly controllable – and it flies one minute longer than the Leader or the Babyhawk. For the price an absolute recommendation, especially when you consider that you don’t have to do much modding anymore and get a mini rocket out of the box.
On the next page: Betaflight Setup
EACHINE LIZARD95 ANNIVERSARY EDITION
Index:
Page 1: Review
Page 2: Betaflight Setup
Page 3: Installing a Runcam Micro
Page 4: Lizard95 Speed Mod
Lizard95 Betaflight Setup
On our Lizard95 Betaflight 3.2.0 is preinstalled and a FrSky SBUS receiver is installed. On the “Ports” page of the Betaflight configurator we activate UART3:

The ESC are set to DSHOT600 by default. If you want, you can activate MOTOR_STOP to prevent the motors from starting up immediately when the quad is arming. Gyro and PID frequency are set to 8 / 2. Accelerometer should be activated when you want to fly in Angle or Horizon mode:
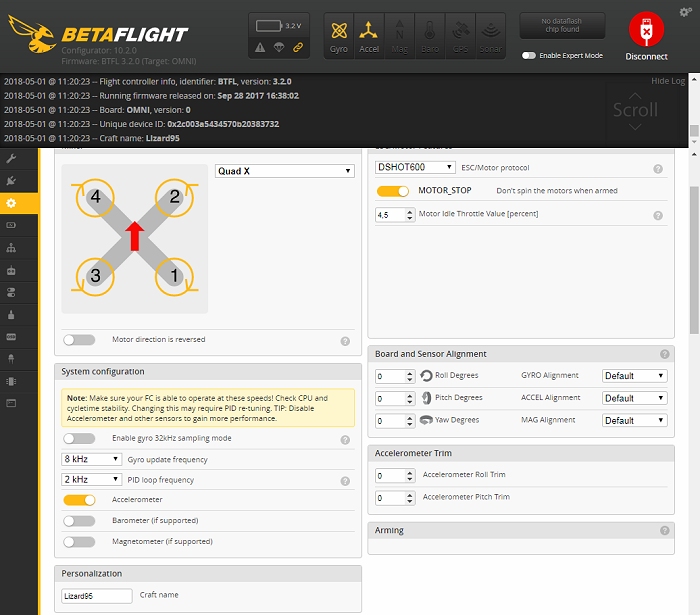
Our Lizard95 comes with an FrSky SBUS receiver, so we activate “Serial based Receiver” and SBUS:
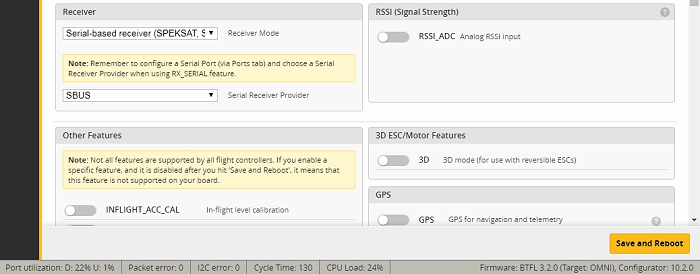
Under “Features”, “OSD”, “LED” and “Dynamic Filter” are enabled:

The beeper configuration is as follows:

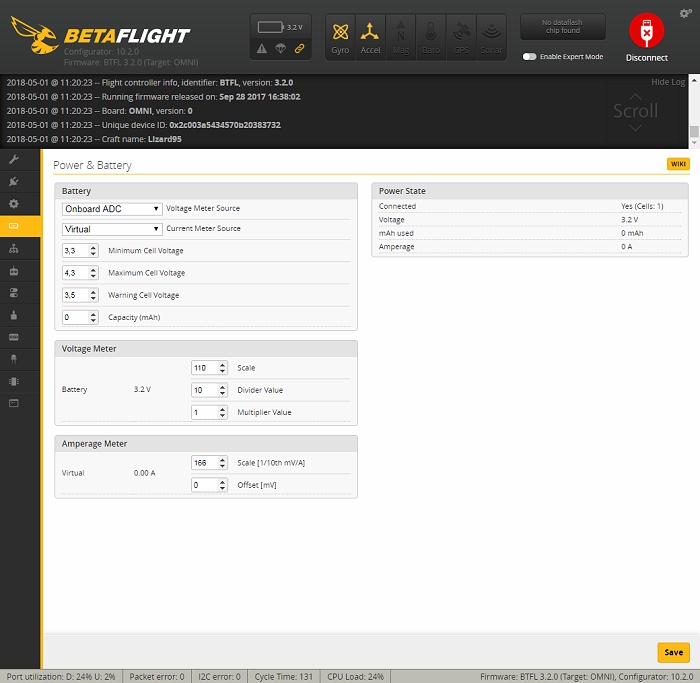
The voltage settings of the Lizard95. We want to see the already flown milliamperes on the OSD in flight. We therefore set the “Current Meter Source” to “Virtual” and enter a scale value of “166” for “Amperage Meter”, which is a decent value if you fly with 3S Lipos. If the display of the mAh consumed in flight does not exactly match the one that you charge back into the battery after the flight, you must increase or decrease this value slightly:
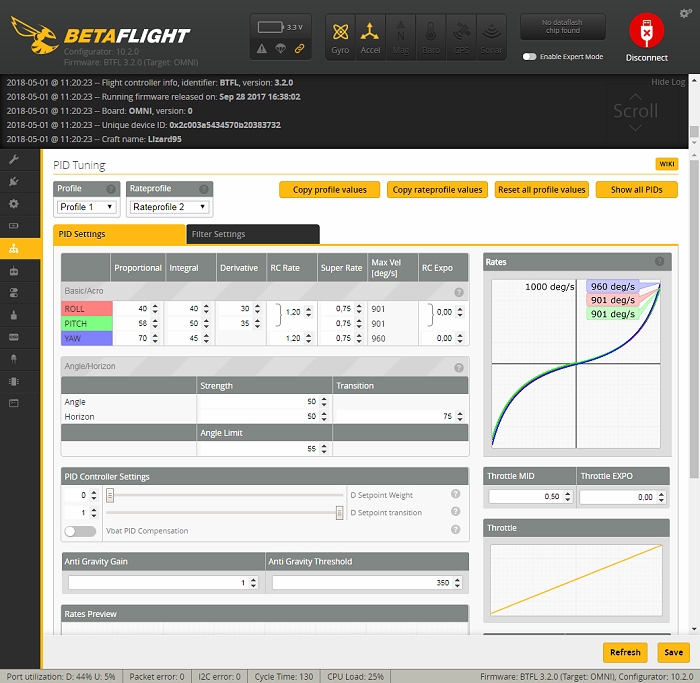
The preset PIDs of the Lizard95 are perfectly suited for flying with a 3S Lipo. You don’t have to change anything here. The rates (stick sensitivity) can be adjusted at will. With the advice shown here the Lizard flies nicely fast and agile. The settings of the dynamic filter are also preset and can be left as they are.
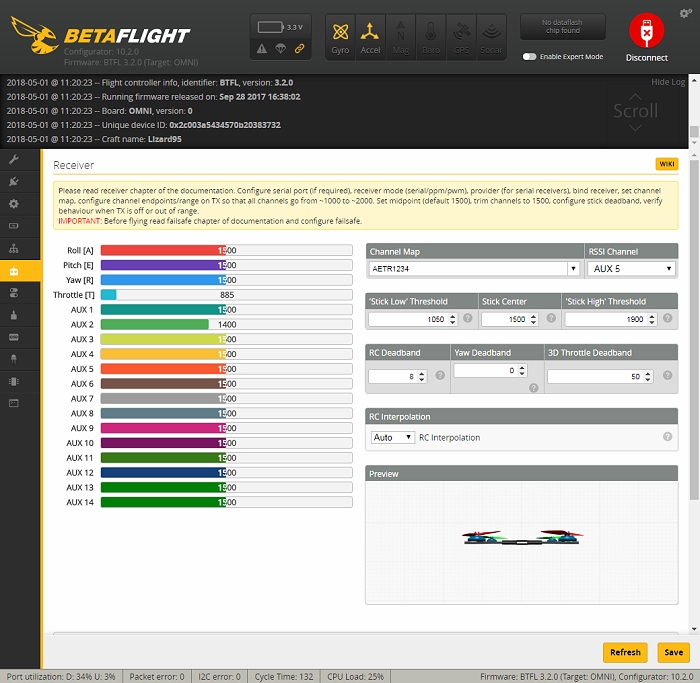
Make sure that the “Channel Map” in Betaflight matches the order of the channels on your radio transmitter. In our case it’s “AETR1234”. Otherwise the channels may not match. The FrSky Receiver of the Lizard95 supports RSSI (display of the current reception strength of the remote control in the OSD). That’s very convenient. The RSSI signal will be transmitted to AUX5, which is also indicated on the receiver page:
On the next page: Installing a Runcam Micro Swift
EACHINE LIZARD95 ANNIVERSARY EDITION
Inhalt:
Page 1: Review
Page 2: Betaflight Setup
Page 3: Installing a Runcam Micro
Page 4: Lizard95 Speed Mod
Stock Cam VS Runcam Micro Swift
Basic rule: the true performance of an FPC cam turns out only with English weather, not with Californian. Means: in cloudy conditions, not in sunshine. It would be nice if the manufacturers understood that.
The Lizard95 comes with an FPV cam that is average at best. In sunny weather it is quite usable, but in poor light conditions it quickly breaks down. So we chose the Runcam Micro Swift, which provides a perfect picture in every situation.
Consider yourself wether you want to replace the stock cam of the Lizard95 with a Runcam Micro Swift or not. The stock cam provides useful images in sunshine, but is very dark and dull in cloudy weather. Also when changing between light to dark areas (sky to ground) the stock cam doesn’t perform really well, the ground remains extra dark for a few moments and only lightens up slowly. This effect is even more dramatic on cloudy days.
The Runcam, on the other hand, always keeps the same exposure, whether sky or ground, sunny or cloudy. In addition, you can adjust the settings of the Runcam as you like via OSD, the stock cam has no settings whatsoever. However, the Runcam with the VTX03 transmitter has a bit more weight, which makes the Lizard a little less lively.
Comparison Video:
Installing a Runcam Micro Swift
In addition to the Runcam we also have to install a new video transmitter, because the video transmitter of the Lizard95 is fixed to the original camera. We choose the popular VTX03, which transmits at 200 mW, is very light and small, and already performs excellently in many mini quads.
After we exchanged the original cam and video transmitter for the Runcam and a VTX03, the Lizard95 will be about 5-7 grams heavier than before. So you lose a little liveliness and agility in flight (10-15% by feeling), but you have a great video image, which is always perfectly exposed.
Unfortunately the original frame of the Lizard95 is about 2mm too narrow for the Runcam. You could simply clamp them between the two side parts, but these then bend outwards so strongly that there is danger of breakage.
I have therefore designed new side panels for the Lizard95, which you can print out with the 3D printer. Simply replace the original side panels with the printed ones, then you can easily attach the Runcam Micro and the VTX03 video transmitter:

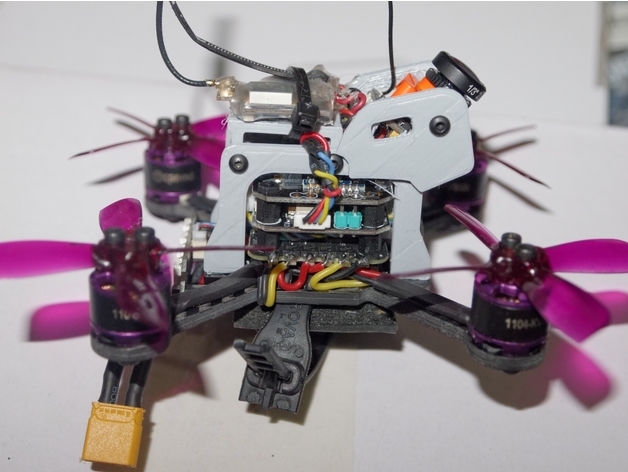
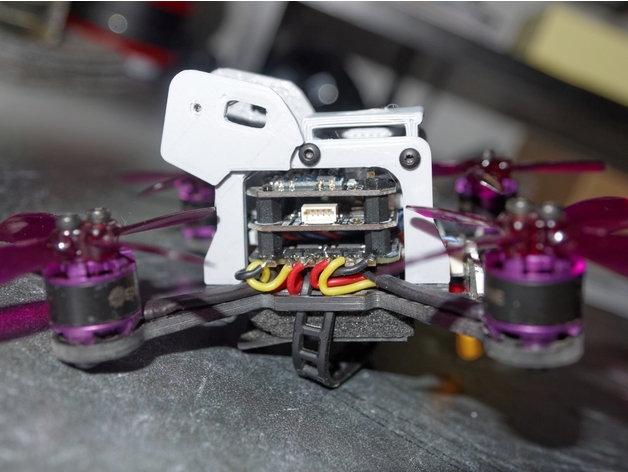
You can download the modified side frames for free on Thingiverse .
The wiring of the Runcam and the VTX03 video transmitter is quite simple. This can be seen on the following picture. Since the Lizard95 comes with a connector plug for the video transmitter, we only have to connect the Runcam and the video transmitter with this plug. Nothing has to be soldered on the board itself:
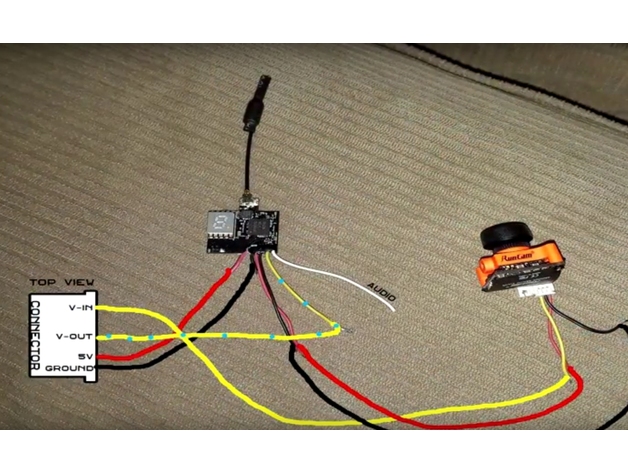
On the next page: Installing a Runcam Micro Swift
EACHINE LIZARD95 ANNIVERSARY EDITION
Inhalt:
Page 1: Review
Page 2: Betaflight Setup
Page 3: Installing a Runcam Micro
Page 4: Lizard95 Speed Mod
Lizard95 Speed & Agility Mod
The Lizard95 is a lightweight – and that’s what makes it so fast and agile. The addition of a Runcam and a VTX03 provides a much better picture, but also makes the Lizard noticeably slower. Every gram really counts with the Lizard. In order to get the greatest possible manoeuvrability out of the small, the following is recommended:
Use the original cam
Well, the original FPV cam of the Lizard is only suitable for sunshine – but then it is quite usable! So if you usually fly in good weather, you should use it and refrain from adding a Runcam, which, especially together with the VTX03, packs a few grams more on the Lizard.
Get rid of the cloverleaf antenna!
The cloverleaf antenna of the Lizard is well-intentioned, but in terms of quality it is scrap metal. After just a few flights, the fragile middle bridge between the two “clovers” breaks, which repeatedly causes annoying picture dropouts in flight. Our tip: do not even repair, but immediately replace it with this flexible whip antenna. The result is an even better and more stable image – which does not exactly speak for the quality of the Eachine Cloverleaf antenna.
Get rid of the antenna protectors!
If you have exchanged the bad cloverleaf antenna of the Lizard for a whip antenna, you don’t need the two carbon side panels anymore, because they only protect the cloverleaf antenna. These can be easily unscrewed, saving even more weight.
Get rid of the LED Strip!
The LED Strip weighs another 1-2 grams. However, thanks to the plug, this can be easily removed, which again saves weight without any effort at all.
Which props?
The original 5-blade props, with which the Lizard95 comes, bring the best thrust in our experience. It should therefore be used. However, these are quite fragile and bend easily, which is noticeable in flight by vibrations. An alternative are the Gemfan 2035 4-blade propellers, which deliver slightly less thrust than the 5-blade, but are significantly more stable and less vibrating.
All these tips together, depending on your flying style of course, bring almost an additional minute more flight time or make the Lizard as fast and agile as possible.
⭐️Tipp:
The receiver antenna of the Lizard has a poor quality. If you experience problems with the reception or the range (“TXLOSS”), replace it with these 2.4GHz antennas of better quality. Like the original antenna, these can be simply clipped on but ensure perfect reception (not only for FrSky but also DSM etc.). Unfortunately they are a bit long, but on the following pictures you can see how they can be accommodated in the Lizard. And don’t forget: secure the plug of the antenna on the receiver with a blob of hot glue so that it cannot come loose over time.
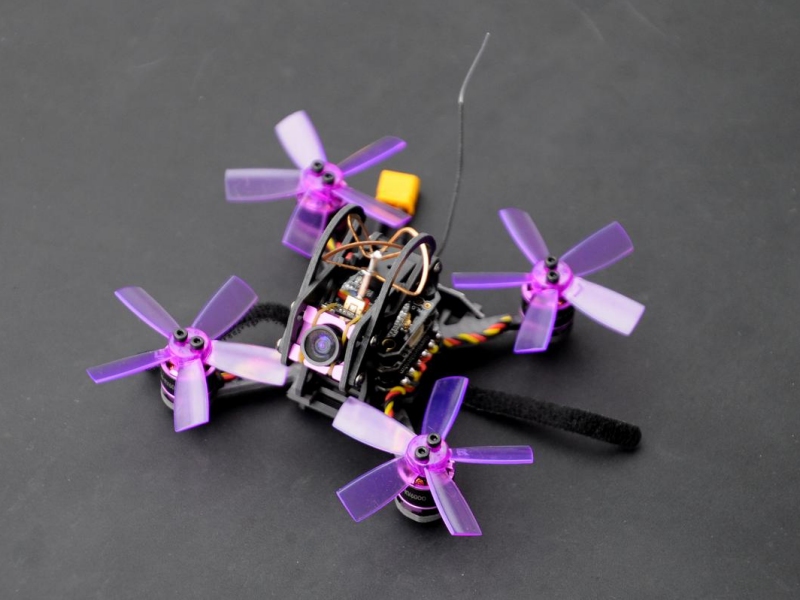
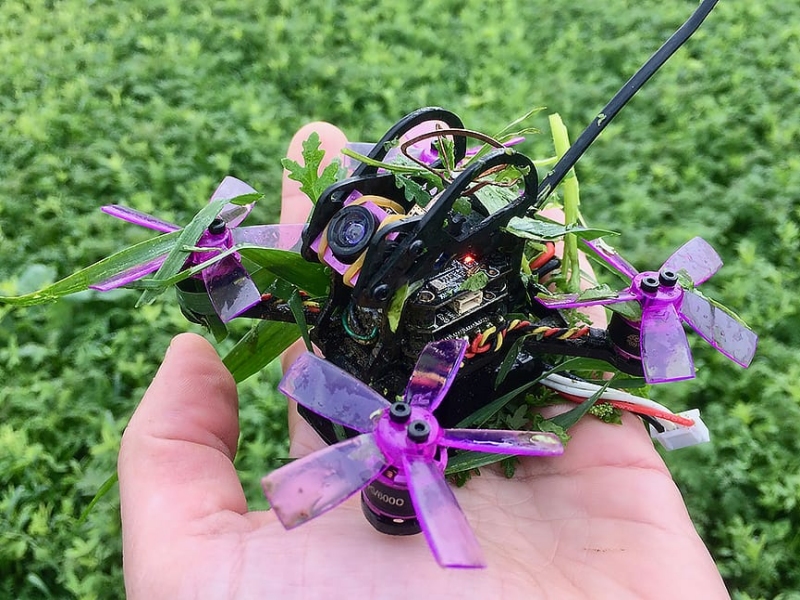
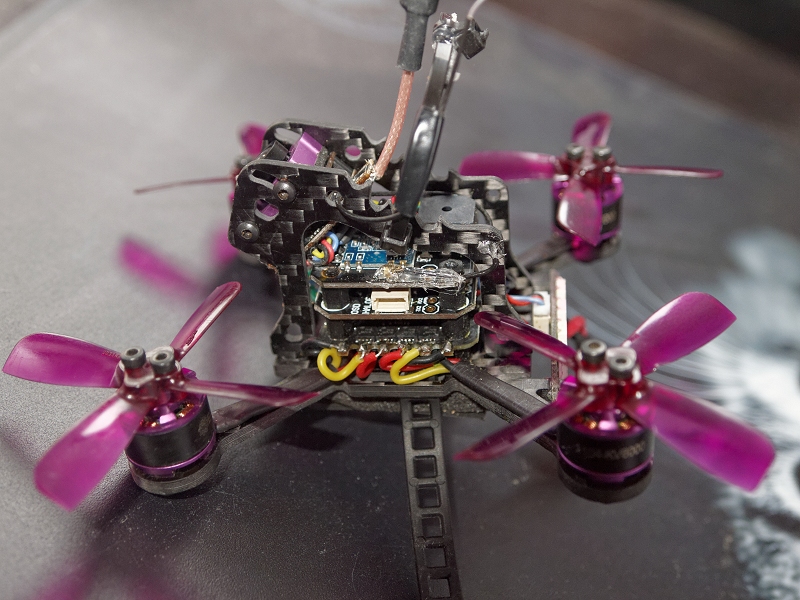
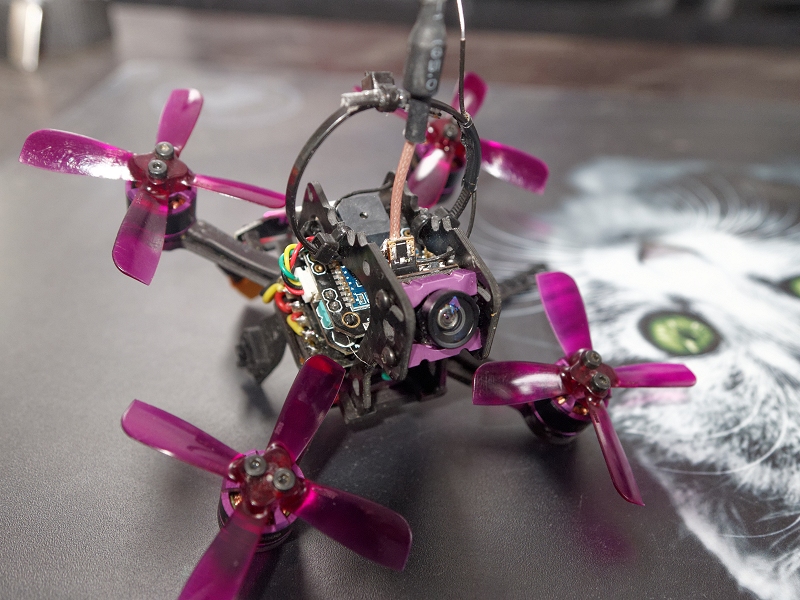
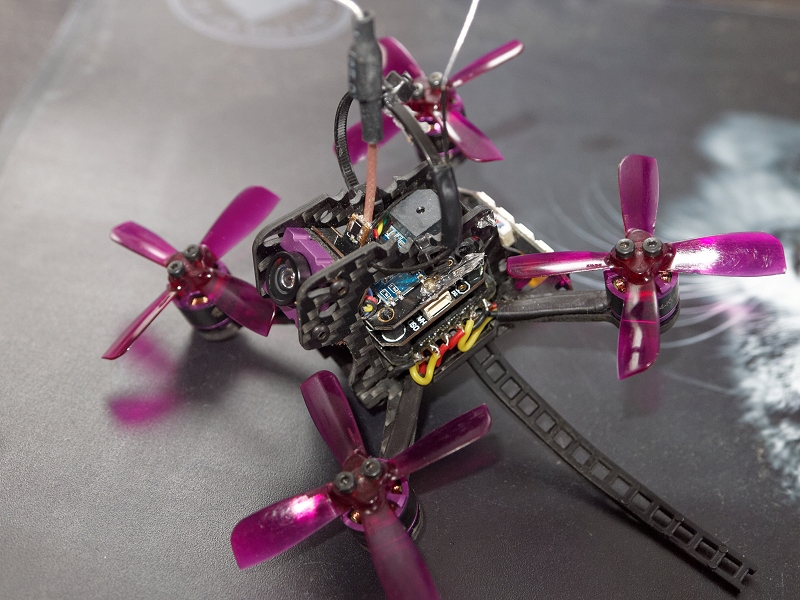
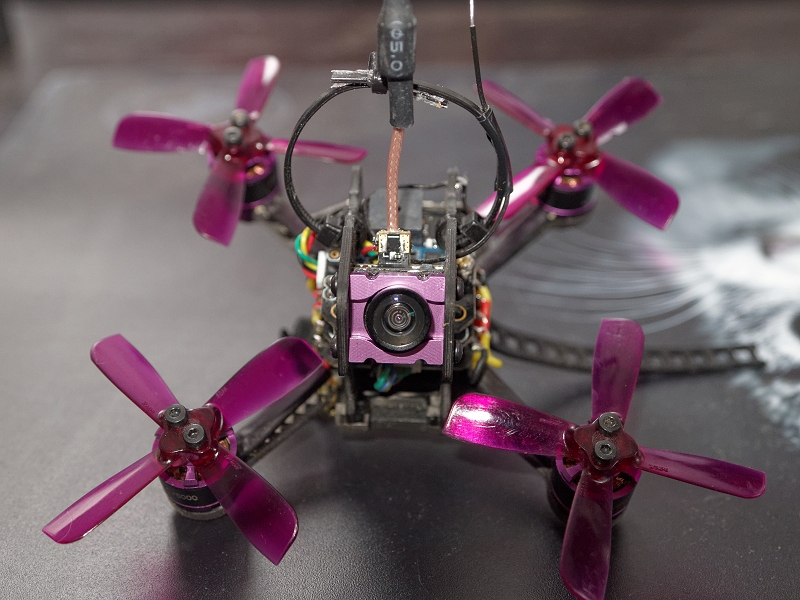
The following pictures show the modded Lizard95, where the Cloverleaf was replaced by a whip antenna and the carbon side panels were saved. To protect the whip antenna a little, you can attach two cable ties on the left and right side of the frame and bring them together above the antenna, creating a kind of ring. The receiver’s antenna, which is quite long after all, can also be attached here:
You think this article raised lots of questions? Or you're interested into this topic and would like to know more about? Want to express your personal oppinion? Then feel free to drop a comment here.
View PagedView all articlesArticles in this category








 Author: Mike vom Mars
 SHIRTS & HOODIES


