KingKong 90GT – LED Strip Installation
The Eachine QX95 LED strip fits perfectly on the KingKong 90GT. So get one before.
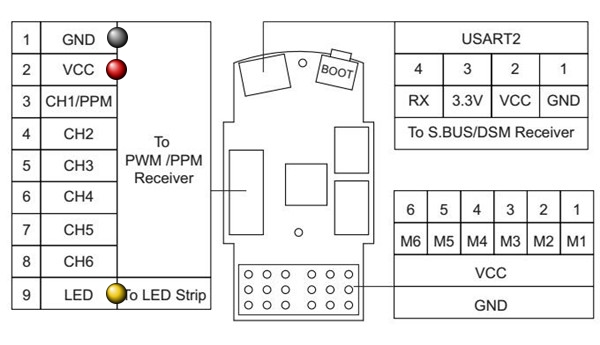
The LED strip is connected to the 9-pin port (the white interface on the left side of the board). Ideally, there’s already a plug included with the KingKong package that fits into this port. Since we need three wires only (power, GND and signal), we can remove all the other wires from that plug.
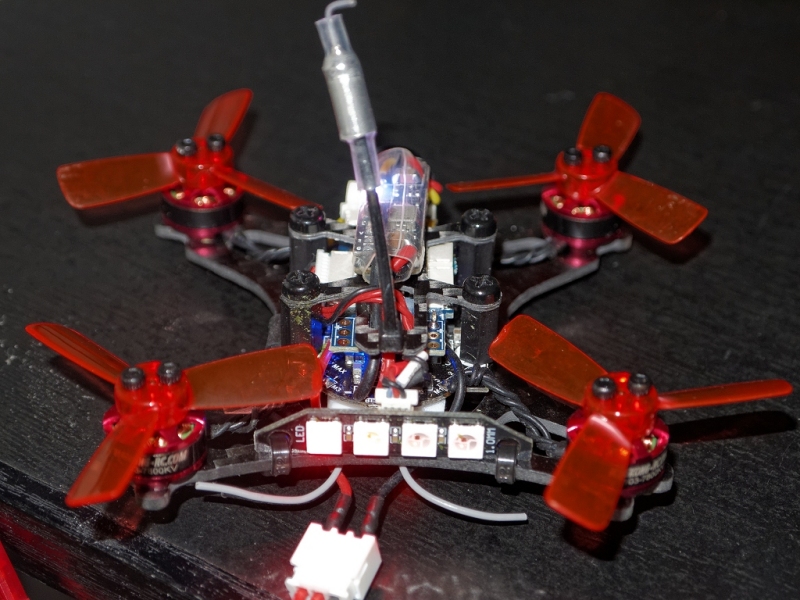
The topmost wire on the plug is the GND wire. Solder it to the GND wire of the LED strip. The second wire on the top of the plug is the power wire, it goes to the power wire of the strip. The wire on the very bottom of the plug is the signal wire. Connect this one to the signal wire of the strip:

The LED strip itself can be easily attached on the back of the KingKong, using two thin cable ties. There is no need to glue it permanently. Watch out for the wires and make sure that they’ll never touch the props, even on a crash or hard landing:

LED Strip Configuration
Connect the Kong to the PC and open BetaFlight. Go to the “Cogwheel” page and enable the “LED_STRIP” feature. Then hit SAVE.
You’ll find a new page symbol on the left side then – a small LED icon. Click it to go to the LED configuration page.
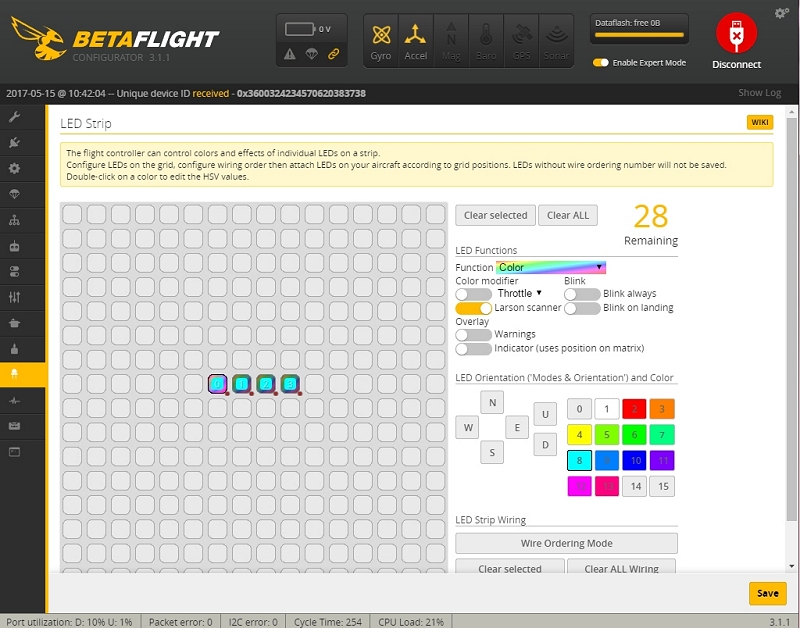
Now click the “Wire Ordering Mode” button. Then click on four successive boxes in the grid. This adds four new LEDs, numbered from 0 to 3. When done, click the “Wire Ordering Mode” button again to leave that mode.

Now click on each LED box (numbered 0 – 3). With each box, click on “Funtion” on the right side of the interface, chose “Color” there and then your desired color. Repeat this with each LED box.
Now click the SAVE button. To test your work, connect a Lipo battery to the KingKong. The LED strip should now light up.
You can even enable or disable the LED strip using a switch on your TX! Go to the “Modes” page in BetaFlight and activate the “LEDLOW” mode and select an AUX channel on your TX.
This is how it looks like:
| Useful Links |
|---|
| KingKong 90GT at Banggood |
| KingKong 90GT Spare Props |
| Racerstar 1935 5-Blade Props |
| LED Strip |
| 2S 850mAh Akkus at Hobbyking |
| 1000TVL Micro FPV Camera |
Articles in this category
Recent Comments
Leave a Reply
You must be logged in to post a comment.


 SHIRTS & HOODIES


Very good writeup on the 90gt. Any more tips.on tuning will be appreciated.
This is great, very nice writeup – don't suppose you've added OSD to your 90GT? I'd love to see a similar writeup for that with wiring diagrams etc.
I did not add an OSD yet since I don't see any reason to do so. The only useful information would be the battery voltage, but I set up a timer on my TX that alerts me in time. If there are other advantages of adding an OSD, let me know and I'll probably give it a try
Hi Mike, how did you *hide* the dsm receiver in this KingKong without using your designed lipo tray?
Bob, I added three more pictures to the slide show above that show how I added the receiver. See the last three images. Watch the green / yellow / black cable, they go to the receiver. I placed it on top using some hot glue. You have to tilt the receiver 90 degrees the side and place it between the buzzer and the video transmitter.
Is there a way to adjust the low voltage cutoff my drone drops out when I give full throttle at around 3 half min than it'll fly unless I punch it. 450mah 50c
If the quad powers off or reboots, it may be caused either by a weak (old) Lipo or a weak LDO. The LDO is the part on the flight controller board that supplies constant 5V power. If the LDO can't deliver enough regulated 5V power for the receiver, cam, VTX etc., the board will shut down or reboot. The lag of power supply could be solved by adding a 5V BEC (like this one: http://bit.ly/2Dh7I1Z). Its power output is much more stable than the built in power converter (also provides more ampere). The BEC's input is connected directly to the Lipo pads, the output can be used to feed receiver, LEDs, cam, VTX etc.
Please help, I follow your the buzzer instruction that is good but when Arming and flying the buzzer work during flying and stop when disarming.
@Nguyen: probably a too sensitive low voltage setting in Betaflight? Also install the latest Betaflight GUI, it has a section to configure the buzzer in detail (beep conditions). Also check your RC channels in Betaflight to ensure that the arm switch does not activate the buzzer.
should I connect to +b or -b ?
one set of instructions showed -b, but you seem to show +b